Multi-camera live streaming has quickly become one of the most in-demand services for photographers, videographers, and content creators. Schools want to stream graduations. Churches need to reach members who can’t attend in person. Businesses are broadcasting conferences to remote teams. And all of them want more than a single static camera pointed at a stage.
I offer multi-camera live streaming as a professional service through my business, and I’ve produced live streams for everything from intimate church services to corporate events with over 450 people in the room. I run the entire operation solo—multiple cameras, wireless video transmission, real-time switching, audio management, and broadcast—without needing an assistant (though helpers certainly speed up setup and teardown).
In this guide, I’m going to walk you through exactly how I set up a professional multi-camera live stream from start to finish. I’ll cover the cameras, power solutions, wireless video transmitters, the video switcher, audio, broadcasting software, internet connectivity, and the testing process that keeps everything running smoothly. Whether you’re looking to add live streaming as a paid service or want to improve your organization’s in-house setup, this guide covers everything you need to know.
Multi-Camera Live Streaming Equipment at a Glance
Before we dive into the details, here’s a quick overview of every component in my professional multi-camera live stream setup:
| Component | What I Use | Why It Works |
|---|---|---|
| Cameras | Sony a7 IV (2–4 bodies) | Beautiful image quality; doubles as my photography camera for other work |
| Power | USB power banks + V-mount batteries | Self-contained power at each camera position—no cables to wall outlets |
| Wireless Video | Hollyland Mars 400S & Cosmo C1 | Reliable wireless HDMI transmission; no cable runs across the venue |
| Video Switcher | Blackmagic ATEM Mini Pro (8-ch) | Real-time switching with built-in recording to SSD |
| Audio | 2-channel audio interface + XLR + shotgun mic | Primary house audio with backup microphone for redundancy |
| Software | OBS Studio (free) | Overlays, scenes, PowerPoint integration, and broadcast management |
| Internet | Hardwired Ethernet + Starlink backup | Dedicated connection for reliable, uninterrupted streaming |
| Monitor | External HDMI display | Multiview of all camera angles and live output |
Choosing the Right Cameras for Multi-Camera Live Streaming
The foundation of any multi-camera live stream setup is the cameras. The key requirement is straightforward: you need cameras with HDMI output. That’s the non-negotiable. There are dedicated live streaming cameras on the market, and some of them are excellent, but you don’t need purpose-built streaming cameras to get professional results.
I use my Sony a7 IV mirrorless cameras for live streaming because they’re the same cameras I use for all of my other professional work—portraits, events, product shoots. The image they produce through HDMI output is outstanding, especially when paired with quality lenses. Using cameras you already own across multiple revenue streams makes a lot of financial sense when you’re building out a live streaming kit. If you’re looking to master the Sony a7 IV for both live streaming and everyday shooting, I cover everything you need to know in my Sony a7 IV Fast Start Guide course.
How Many Cameras Do You Need for a Live Stream?
I typically use between two and four cameras per live stream, depending on the event. The number of cameras you’ll need comes down to a few key factors:
- The size of the stage and the number of distinct angles you need to capture
- The level of production quality your client expects
- Whether you have dedicated camera operators or are running unmanned cameras on tripods
- The complexity of the event (single speaker vs. panel discussion vs. live performance)
A single camera pointed at the stage from the back of the room will technically work, but it’s not going to deliver a professional viewing experience. Multiple camera angles—a wide establishing shot, a medium shot, and a tight close-up—give you the ability to cut between perspectives in real time and keep your remote audience engaged. This is what separates amateur live streams from professional productions.
Solo Operation vs. Camera Operators
Running a multi-camera live stream by yourself is absolutely doable—I do it regularly. But having someone behind each camera makes a real difference in shot quality, especially for dynamic events like live music or conferences with multiple speakers moving across a stage. When I’m working solo, I set my unmanned cameras on tripods with locked-off compositions and keep one camera within arm’s reach at my switching station so I can make quick adjustments.
For live music production, I’ve occasionally used a shoulder-mounted camera rig with a dedicated operator. That camera was fully rigged with handles and ran completely wireless—transmitting its signal back to my switcher without any cables. It’s a more advanced setup, but for the right event, it adds significant production value.
Pro Tip: If you’re just getting started with multi-camera live streaming, begin with two cameras: one wide shot and one close-up. Master the basics of switching between two angles before adding more cameras to your rig. You can always scale up as you get more comfortable and as clients request more complex productions.
How to Power Your Cameras for Multi-Hour Live Streams
Battery life is a real concern when you’re live streaming for several hours. Modern mirrorless cameras have much better battery performance than earlier models, but if you’re streaming for three, four, or more hours straight, the internal camera battery alone won’t be enough.
My approach is to keep everything at each camera position completely self-contained. No cables running across the floor to wall outlets. No extension cords creating trip hazards. Every camera station has its own independent power source.
For Shorter Live Streams (Up to 4 Hours)
A quality USB power bank placed underneath or strapped to the tripod works well for streams up to about four hours. You’ll get the full internal battery life from the camera, plus an additional two to three full charge cycles from the power bank. The same power bank can also power your wireless video transmitter, keeping the entire camera station self-contained and cable-free.
For Longer Live Streams (4+ Hours)
For extended streaming sessions, I switch to V-mount batteries. A V-mount battery attaches directly to the camera rig and can power both the camera and the wireless transmitter simultaneously for many hours. These batteries are a bigger investment upfront, but they’re absolutely essential for professional live streaming work where you can’t afford to have a camera go down mid-event because the power ran out.
Wireless HDMI Video Transmitters: Eliminating Cable Runs
This is the component that completely transformed my live streaming workflow. Running HDMI cables from each camera position back to the switcher is possible, but it creates significant problems: trip hazards for attendees, cable management headaches, and latency issues over longer distances that cause your camera feeds to fall out of sync during switching.
Going wireless solved all of these issues and made my setup dramatically more professional and efficient.
Why Wireless HDMI Matters for Live Streaming
When you run HDMI cables over longer distances, you start introducing signal latency. That means when you’re cutting between camera angles during the live stream, the feeds won’t be perfectly synchronized—and your viewers will absolutely notice. Wireless video transmitters eliminate this problem while also keeping your venue clean and your setup portable.
Hollyland Wireless Transmitter and Receiver Kits
I use Hollyland wireless HDMI kits for my live streaming setup. The concept is simple: a small transmitter unit attaches to your camera’s HDMI output, and a corresponding receiver unit connects to your switcher’s HDMI input. The video signal broadcasts wirelessly between the two using built-in antennas.
I rely on two Hollyland models:
- Hollyland Mars 400S — This is the more affordable option and it’s remarkably capable for the price. If you’re just getting started with wireless live streaming, this is an excellent entry point. It offers solid range and reliable performance for most venue sizes.
- Hollyland Cosmo C1 — This is my higher-end unit for situations where I need maximum range or I’m working in particularly challenging RF environments. The extra investment is worth it for larger venues and critical productions.
Real-World Wireless Performance in Crowded Venues
One of the most common questions I get is whether wireless video transmitters actually work reliably in a room full of people with cell phones. The answer, based on my extensive real-world experience, is a definitive yes. I’ve streamed in venues with over 450 people—all carrying smartphones—and experienced zero connectivity issues. I was broadcasting from a transmitter on one corner of the stage to a receiver at the opposite back corner of the room, directly over the entire crowd, without a single dropout.
The Hollyland units are designed for professional production environments and handle crowded RF conditions exceptionally well.
Pro Tip: Always Keep One Camera Hardwired. No matter how reliable your wireless setup is, I always keep one camera physically connected to the switcher via an HDMI cable. This is my failsafe. If every wireless transmitter in the room failed simultaneously, I’d still have at least one live camera feed. It’s a simple insurance policy that takes almost no extra effort to implement and provides enormous peace of mind during live events.
Running HDMI Cables (If Wireless Isn’t in the Budget Yet)
If wireless transmitters aren’t in your budget right now, you can absolutely run HDMI cables for your multi-camera live stream setup. A few things to keep in mind: gaff tape every cable to the floor so attendees don’t trip, run cables along walls or over rafters whenever possible, and be aware that latency increases with cable distance. Once you exceed the reliable range for your cables, your camera feeds will start to fall out of sync when you switch between angles.
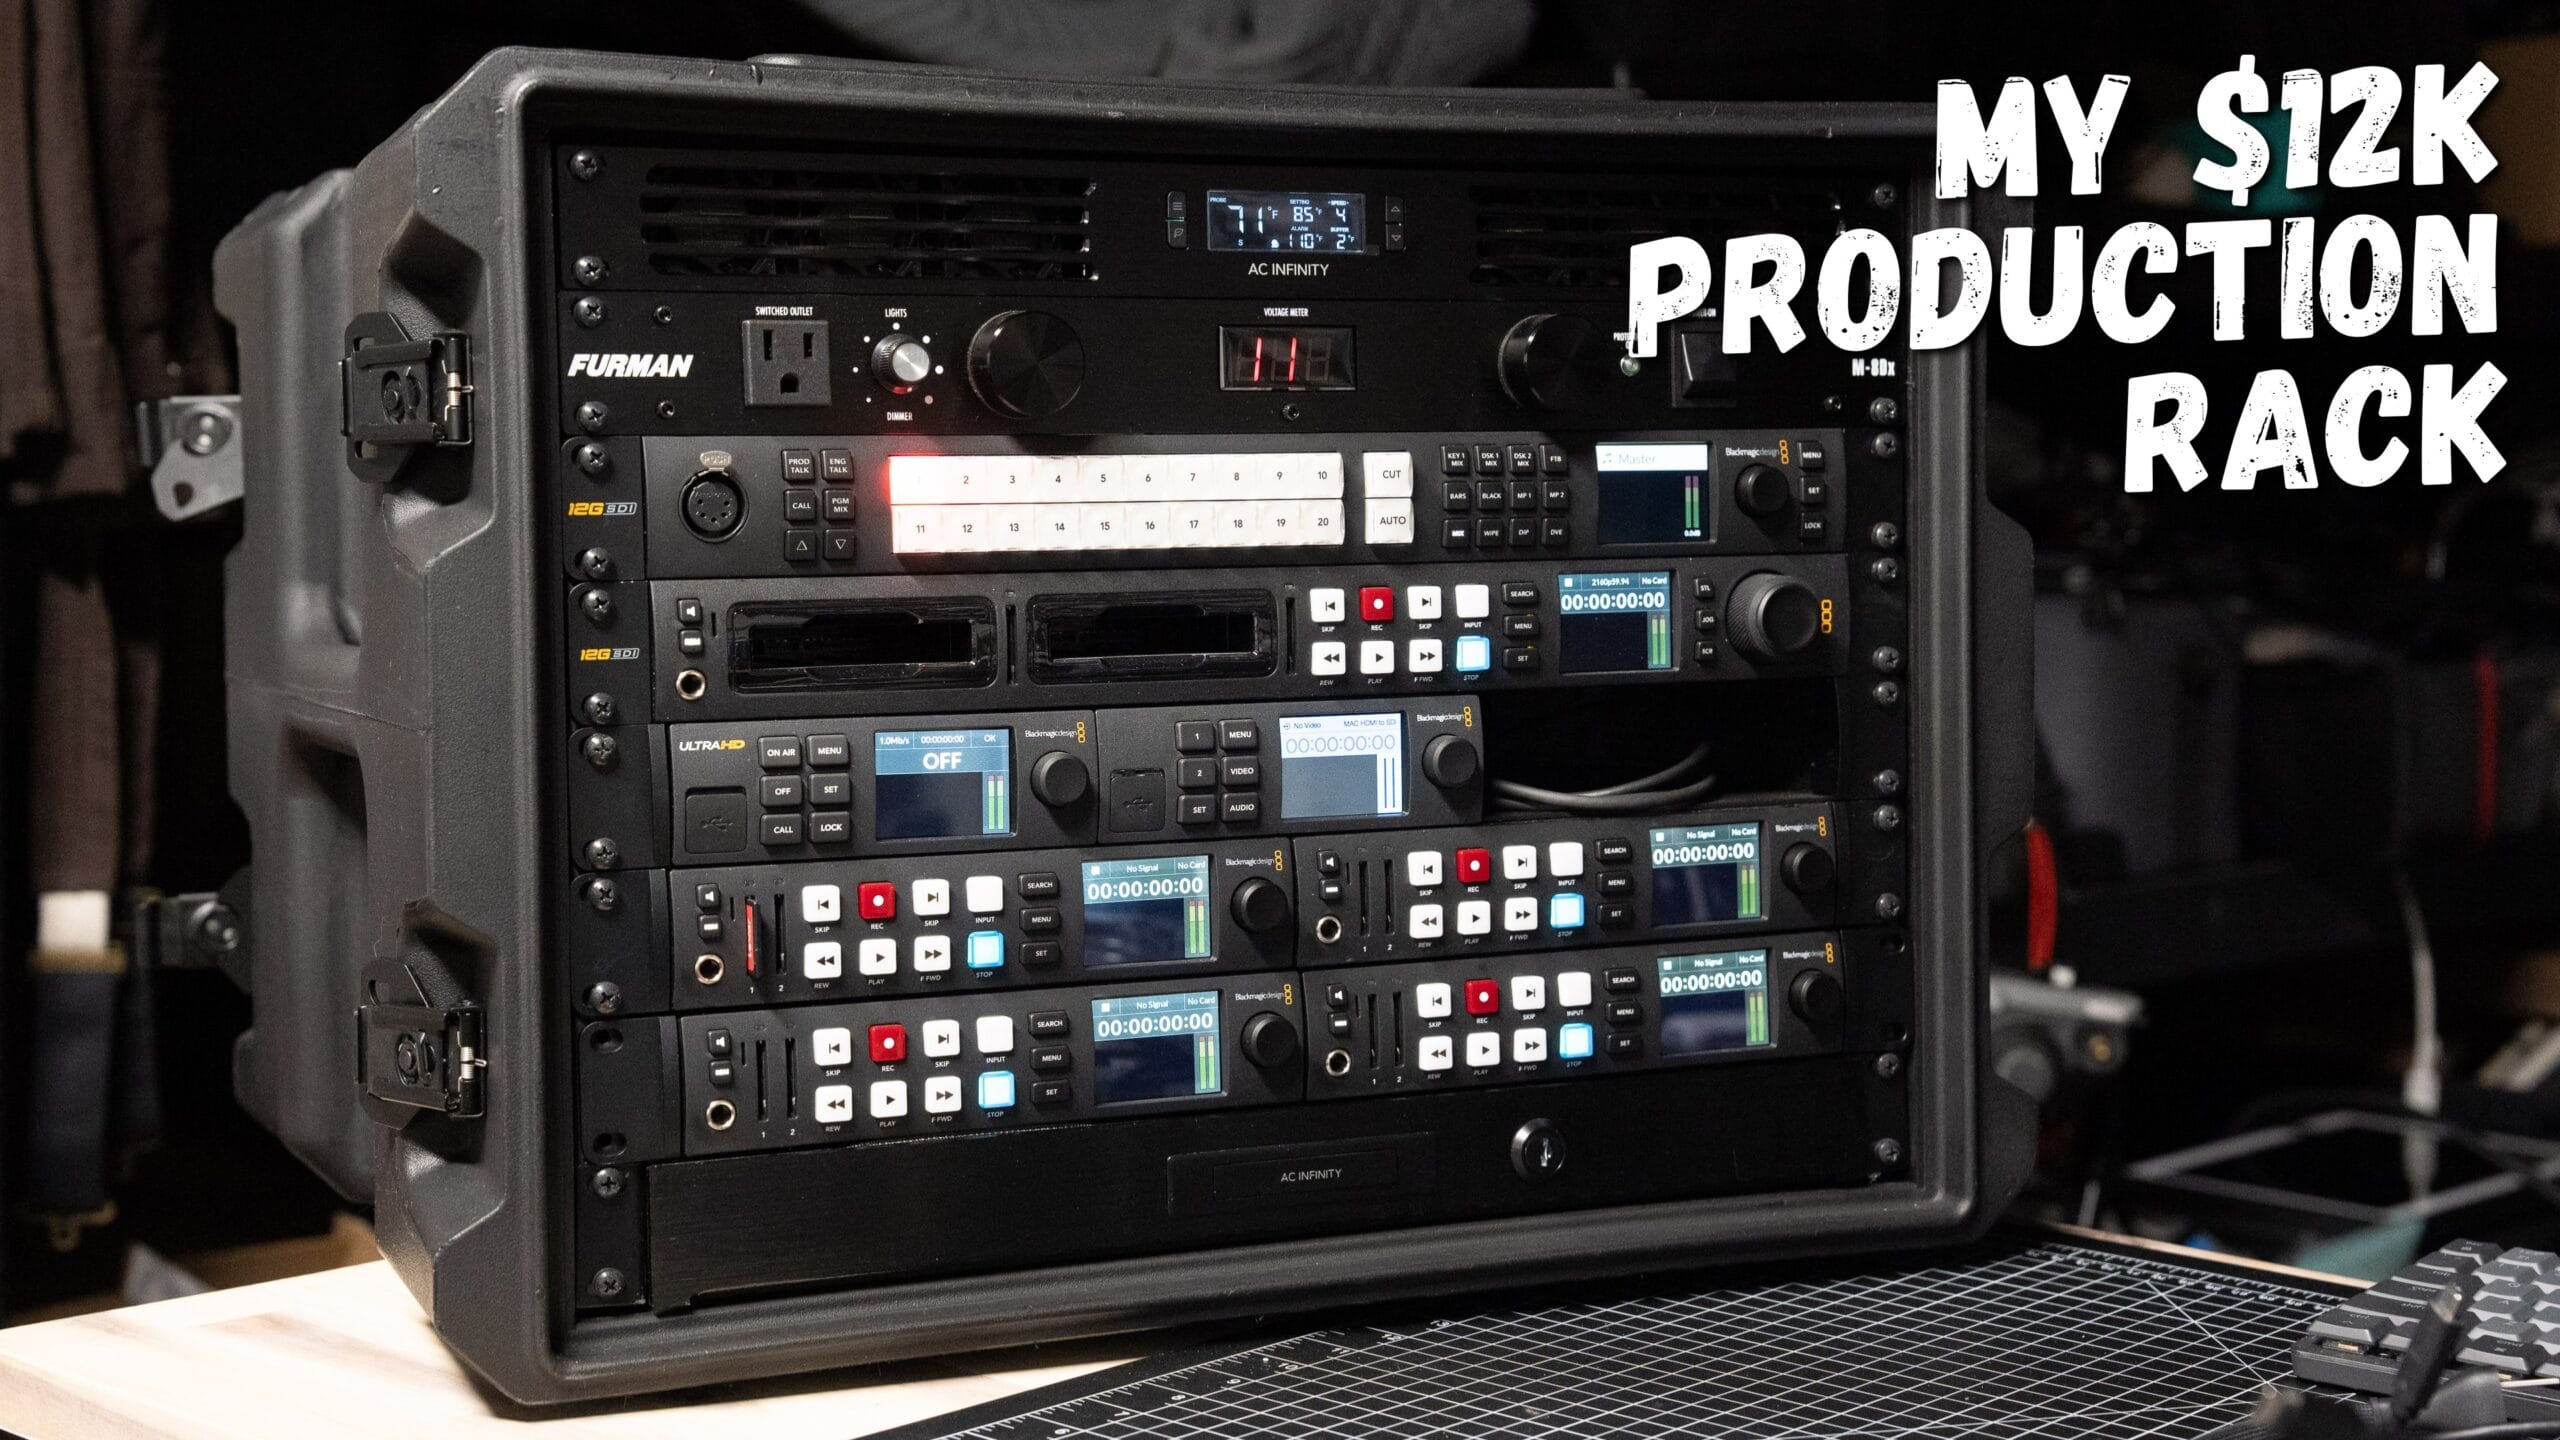
The Video Switcher: Blackmagic ATEM Mini Pro
The video switcher is the command center of your multi-camera live stream. It’s where all of your camera feeds come together, and it’s what enables you to cut between angles in real time—essentially editing a finished production on the fly.
Why I Use the Blackmagic ATEM Mini
I use the Blackmagic ATEM Mini, and I believe it’s the best price-to-performance video switcher available for live streaming right now. I started with the four-channel ATEM Mini Pro and eventually upgraded to the eight-channel version when a larger event required a fifth camera input.
Here’s what makes the ATEM Mini such a powerful tool for multi-camera live streaming:
- Multiple HDMI inputs (4 or 8 depending on the model) for cameras, computers, and media players
- Multiview monitor output that displays all camera angles plus the live program feed on a single screen
- Built-in recording to an external USB SSD—you’re capturing a fully switched, edited recording in real time
- Professional transition effects and picture-in-picture capabilities
- USB webcam output that works seamlessly with OBS and other streaming software
ATEM Mini Pro vs. ATEM Mini Pro ISO: Which Should You Choose?
Both versions of the ATEM Mini Pro record your switched program output to an external SSD, giving you a fully edited recording of the live stream. This is incredibly valuable because live streams can sometimes have dropped frames or slight jitter depending on your internet connection. Having that clean recorded version gives your client a polished backup they can distribute afterward.
The ISO version adds one critical feature: it also records each individual camera feed as a separate file, along with a DaVinci Resolve project file. This is useful if your client wants you to re-edit the footage after the event—perhaps creating shorter clips for social media or a highlight reel using the individual camera angles.
For most live streaming work, the standard ATEM Mini Pro is more than sufficient. The ISO version is worth the premium if you regularly provide post-production editing services in addition to the live stream itself. Blackmagic also makes the ATEM Mini Extreme ISO with eight HDMI inputs for larger productions—that’s what I upgraded to when I outgrew the four-channel model.
A Note on Resolution: The ATEM Mini processes everything at 1080p HD. Even if your cameras are shooting 4K internally, the ATEM downsamples all inputs to 1080p. For live streaming, this is perfectly fine—1080p remains the standard for live broadcast content. If a client specifically needs 4K footage, you can record internally on each camera simultaneously, but the live stream output and the switched recording will be 1080p.
Audio Setup for Live Streaming: The Most Overlooked Element
Audio quality can make or break a live stream, and it’s the area where I see the most corners being cut. Viewers will tolerate slightly imperfect video, but poor audio will cause them to leave immediately. The ATEM Mini does have a built-in audio input, but it’s a small 3.5mm headphone jack—not ideal for professional-grade live streaming.
My Professional Live Streaming Audio Setup
Instead of relying on the ATEM’s built-in audio input, I use a dedicated two-channel USB audio interface. This gives me two independent audio sources:
- Primary audio (Channel 1): An XLR feed directly from the house sound board. This delivers the cleanest possible audio because it’s coming straight from the venue’s mixing console—no room noise, no echo, just clean direct audio.
- Backup audio (Channel 2): A shotgun microphone that I boom as high as I can safely position it, aimed over the crowd toward the stage. This serves as my emergency fallback.
Why a Backup Audio Source Is Essential
Having that backup microphone has saved me more times than I can count. Sound engineers make adjustments during live events, and sometimes those changes affect your audio feed without any warning. I’ve had situations where the house audio suddenly changed character mid-event because someone adjusted the mix at the sound board. When that happens, I can immediately switch to my shotgun mic and keep the stream running without any interruption to the viewing experience.
Broadcasting Software: Using OBS for Multi-Camera Live Streaming
The ATEM Mini connects to my computer via USB, where it appears as a webcam source. On my computer, I run OBS Studio (Open Broadcaster Software)—a free, open-source application that has become the industry standard for live streaming.
OBS handles the actual broadcast to your streaming platform while also giving you powerful production capabilities:
- Text overlays and lower thirds for professional-looking graphics on screen
- Multiple scenes with different layouts (full-screen camera, split-screen, presentation mode)
- PowerPoint and Keynote presentation integration—displayed full screen, in a corner overlay, or in a split-screen layout
- Audio mixing and monitoring across multiple sources
- Local recording as a backup in case of internet issues
Many of my corporate clients need PowerPoint integration during their live streams, and OBS makes it straightforward to switch between the live multi-camera feed and a presentation—or to display both simultaneously. The flexibility OBS provides, combined with the ATEM Mini’s hardware switching, creates a professional broadcast setup that consistently impresses clients.
Internet Connection: The Make-or-Break Factor for Live Streaming
You can build the most beautiful multi-camera live stream setup in the world, and none of it matters if your internet connection drops during the broadcast. A solid, consistent internet connection is the single most critical infrastructure element for live streaming.
Why Hardwired Ethernet Is Always Better Than Wi-Fi
Wi-Fi is inherently unreliable in rooms full of people. Hundreds of smartphones, tablets, and laptops all competing for bandwidth create interference that can cause your stream to buffer, stutter, or drop entirely. My first priority for any live streaming event is to secure a hardwired Ethernet connection at my streaming station. I coordinate with the venue ahead of time to ensure I can get a dedicated wired connection that isn’t shared with the event’s general Wi-Fi network.
Internet Backup Strategies
Even with a hardwired connection, I always have backup internet options ready to go:
- Starlink: I carry my own Starlink device and can set it up outside the venue as a secondary connection. It provides remarkably solid performance for live streaming as a backup.
- Mobile hotspot: A 4G/5G phone hotspot serves as a last-resort backup. It’s not ideal for sustained HD streaming, but it can keep a stream alive long enough to resolve the primary connection issue.
The key principle is redundancy. Your client is depending on the stream going out without interruption, and the remote audience will notice immediately if there are problems. Multiple internet options ensure that no single point of failure takes down the entire production.
Pro Tip: Request Dedicated Bandwidth. When coordinating with event venues, specifically ask for a dedicated internet connection that is separate from the general event Wi-Fi. When hundreds of attendees connect to the same network you’re streaming on, you’re competing for bandwidth with everyone checking email, posting to social media, and streaming their own content. Dedicated bandwidth eliminates this competition entirely.
Pre-Stream Testing: The Step Most People Skip
Before any live stream broadcast, I run a complete end-to-end test. This isn’t optional—it’s the difference between a smooth professional production and a stressful disaster that damages your reputation with the client.
Complete Pre-Stream Testing Checklist
- Test all camera feeds: Verify that every camera is transmitting properly to the switcher, both wireless and hardwired. Switch between each input to confirm all feeds are active and properly framed.
- Check audio on both channels: Put on headphones and verify that both your primary and backup audio sources are coming through clearly on left and right channels. OBS can sometimes broadcast on only one channel if your settings aren’t configured correctly—this is a mistake your remote viewers will notice immediately.
- Run a test broadcast: Actually go live on a private or unlisted feed that your audience won’t see. Watch it from a separate device as if you were a remote viewer. Evaluate video quality, audio levels, stream stability, and latency.
- Test all switching transitions: Cut between every camera angle to confirm that transitions are smooth and all feeds are in sync. Any latency mismatch between cameras will be visible during transitions.
- Verify SSD recording: Confirm that your external SSD is recording properly through the ATEM Mini. Check that you have sufficient storage space for the full event duration.
- Check internet stability: Monitor your connection for at least 5–10 minutes before the event begins. Look for any dropped packets or bandwidth fluctuations that could affect the stream.
I also strongly recommend practicing your entire setup at home or in your office before taking it to a client event for the first time. Set up multiple cameras, configure the wireless transmitters, connect your audio interface, and run a test stream. Watch it back critically. Find the problems before your client does.
The Complete Multi-Camera Live Stream Setup: How It All Connects
Here’s a full walkthrough of how every component in my professional multi-camera live streaming rig connects together:
- Cameras (2–4 Sony a7 IV bodies): Mounted on tripods throughout the venue. Each camera has its own independent power source (USB power bank or V-mount battery) and a Hollyland wireless HDMI transmitter attached to its HDMI output.
- Wireless receivers: Corresponding Hollyland receiver units are stationed at my switching position, each connected to an HDMI input on the ATEM Mini.
- One hardwired failsafe camera: Positioned next to my station and connected via a direct HDMI cable to the ATEM Mini. This camera keeps working even if every wireless transmitter fails.
- Blackmagic ATEM Mini Pro: Receives all camera feeds (wireless and hardwired), enables real-time switching between angles, and records the fully switched program to an external USB SSD.
- External monitor: Connected to the ATEM Mini’s HDMI output, displaying the multiview—all camera angles, the live program feed, audio meters, and recording/streaming status on a single screen.
- Two-channel audio interface: Connected via USB to my computer. Channel 1 receives XLR house audio from the venue’s sound board. Channel 2 receives the backup shotgun microphone.
- Computer running OBS Studio: The ATEM Mini connects via USB and appears as a webcam source in OBS. OBS manages the actual broadcast, overlays, scene switching, and presentation integration.
- Hardwired internet connection: Ethernet cable from a dedicated connection to my computer, with Starlink and mobile hotspot available as backup.
Who Needs Multi-Camera Live Streaming?
The demand for professional live streaming continues to grow across virtually every sector. Here are the most common clients and organizations I work with:
- Churches and religious organizations: Reaching congregation members who are homebound, traveling, or attending remotely. Multi-camera streaming transforms a static worship service into an engaging viewing experience.
- Schools and educational institutions: Streaming graduations, performances, award ceremonies, and sporting events for families who can’t attend in person.
- Businesses and corporations: Broadcasting conferences, presentations, town halls, and training sessions to remote teams and stakeholders.
- Event production companies: Adding live streaming capability to existing event services for clients who want to extend their audience reach.
- Nonprofits and community organizations: Streaming fundraisers, community meetings, and special events to supporters who can’t be there physically.
Every one of these organizations is a potential client if you’re looking to offer live streaming as a professional service. And for in-house teams, having the knowledge to set up a professional multi-camera live stream is increasingly becoming a core operational capability.
Getting Started: Building Your Multi-Camera Live Streaming Setup
If you’re considering adding multi-camera live streaming to your services, my advice is to start small and build from there. Begin with two cameras, learn your switcher inside and out, and get completely comfortable with OBS. Run practice streams at home until the workflow feels second nature.
If you’re already doing single-camera live streams, upgrading to a multi-camera setup is the single biggest improvement you can make to your production quality. The jump from one camera to two or three cameras makes a dramatic difference in how professional your stream looks and how engaged your remote audience stays.
Live streaming is only going to continue growing as a service. The organizations that need it today will need it even more tomorrow, and photographers and videographers who can offer professional multi-camera live streaming are positioning themselves for sustained demand.
Have questions about multi-camera live streaming? Drop them in the comments below. I’m always happy to help fellow photographers and videographers figure out the gear and workflow that’s going to work best for their specific situation. And if you’re using the Sony a7 IV for live streaming or any other professional work, my Sony a7 IV Fast Start Guide course covers everything from initial setup to advanced configuration so you can get the most out of your camera.
Frequently Asked Questions About Multi-Camera Live Streaming
What cameras do I need for multi-camera live streaming?
Any camera with HDMI output can be used for multi-camera live streaming. You don’t need dedicated streaming cameras—mirrorless cameras like the Sony a7 IV, Canon EOS R6, or similar models produce excellent results and can double as your photography and video cameras for other paid work. The key requirement is a clean HDMI output that sends the live video signal to your switcher. I recommend starting with cameras you already own to keep your initial investment low.
Can one person run a multi-camera live stream solo?
Yes, absolutely. I regularly run professional multi-camera live streams as a solo operator with two to four cameras. The key is setting up unmanned cameras on tripods with fixed compositions, keeping one camera within arm’s reach for quick adjustments, and using a video switcher like the Blackmagic ATEM Mini to cut between angles. Having helpers makes setup and teardown faster, and dedicated camera operators improve shot quality for dynamic events, but solo operation is completely viable for most live streaming scenarios.
How much does a multi-camera live streaming setup cost?
The cost depends heavily on what equipment you already own. If you have cameras with HDMI output, the main additions are a video switcher (the Blackmagic ATEM Mini Pro starts around $350), wireless HDMI transmitters (Hollyland Mars 400S kits are around $200–$300 each), a two-channel audio interface ($100–$200), power solutions, and an external SSD for recording. A complete two-camera wireless setup can be built for roughly $1,000–$1,500 on top of existing camera gear. The ATEM Mini Pro ISO adds around $200–$300 more if you need individual camera recording.
Do wireless video transmitters work reliably in crowded rooms?
Based on my extensive professional experience, yes. I’ve used Hollyland wireless HDMI transmitters in rooms with 450+ people carrying cell phones and experienced zero connectivity issues. I’ve broadcast signals from one corner of a stage to the opposite back corner of a large room, directly over the entire crowd, without a single dropout. Modern wireless video transmitters like the Hollyland Mars 400S and Cosmo C1 are designed for professional production environments and handle crowded RF conditions very well.
What’s the difference between the ATEM Mini Pro and the ATEM Mini Pro ISO?
Both the ATEM Mini Pro and the ATEM Mini Pro ISO record your switched program output to an external USB SSD, giving you a clean, fully edited recording of the live stream. The ISO version adds the ability to simultaneously record each individual camera feed as a separate file, along with a DaVinci Resolve project file for post-production editing. Choose the standard Pro if you only need the switched output. Choose the ISO if your clients want you to re-edit footage, create social media clips, or produce highlight reels from the individual camera angles after the event.
What internet speed do I need for live streaming?
For a stable 1080p live stream, you’ll want a consistent upload speed of at least 10 Mbps. However, raw speed is less important than consistency—a stable 15 Mbps connection is far better than a fluctuating 50 Mbps connection. Always use a hardwired Ethernet connection rather than Wi-Fi whenever possible, especially in venues with large crowds where hundreds of devices are competing for wireless bandwidth. I also recommend having at least one backup internet option (Starlink, mobile hotspot) in case your primary connection fails.
What is the best free software for multi-camera live streaming?
OBS Studio (Open Broadcaster Software) is the industry-standard free software for live streaming, and it’s what I use for all of my professional live stream productions. OBS is open-source, works on Windows and Mac, and handles everything from broadcasting your stream to adding text overlays, managing multiple scenes, integrating PowerPoint presentations, and mixing audio. When combined with a hardware switcher like the Blackmagic ATEM Mini, OBS provides a complete professional broadcast solution at no software cost.