Sony a6400 Setup Guide: The 7 Settings I Change First
Before anything else, set the date and time and put the a6400 in manual mode. Then these are the seven settings I change: RAW & JPEG, XAVC S 4K at 30p 100M for video, AF-A for photos and AF-C for video, Flexible Spot focus area, Focus Standard on the center button so you can move the focus point with your eye to the viewfinder, audio signals off, and copyright info. Bonus tip: always format your card in the camera.
Video
Whenever I get a new camera, there are some settings I like to customize, because I’ve found they make these cameras a little easier to use. What’s funny is that some settings I used to change on older Sony cameras are now just the way the camera works out of the box, which I’m excited about, because the fewer settings I have to change, the better. But there are still seven things I change on the Sony a6400, and the table below has all of them if you just want the settings.
Sony a6400 Settings Quick Reference
| # | Setting | Where to Find It | What I Use |
|---|---|---|---|
| 1 | File Format (still) | Camera Settings1 > File Format | RAW & JPEG |
| 2 | Movie File Format and Record Setting | Camera Settings2 > File Format / Record Setting | XAVC S 4K, 30p 100M |
| 3 | Focus Mode | Fn > Focus Mode | AF-A for photos (AF-S for still subjects), AF-C for video |
| 4 | Focus Area | Fn > Focus Area | Flexible Spot |
| 5 | Center button | Camera Settings2 > Custom Key | Focus Standard |
| 6 | Audio signals | Camera Settings2 > Audio signals | Off |
| 7 | Copyright Info | Setup > Copyright Info | My name, All Rights Reserved, Write Copyright Info on |
| Bonus | Format | Setup > Format | Always format the card in the camera |
Before You Start
Set the Date and Time
I know you’re excited to jump in and start taking pictures, but the first thing you need to do is set the date and time. This isn’t one of the seven. The camera prompts you to do it the very first time you turn it on, so go ahead and set it.
Put the Camera in Manual Mode
Next, I put the camera in manual mode. Ditch Auto is all about shooting in manual and getting the most out of your camera. Auto keeps getting better these days, but it’s still no match for manual mode, where you control the shutter speed, aperture, and ISO yourself so you can get the best possible image out of the camera.
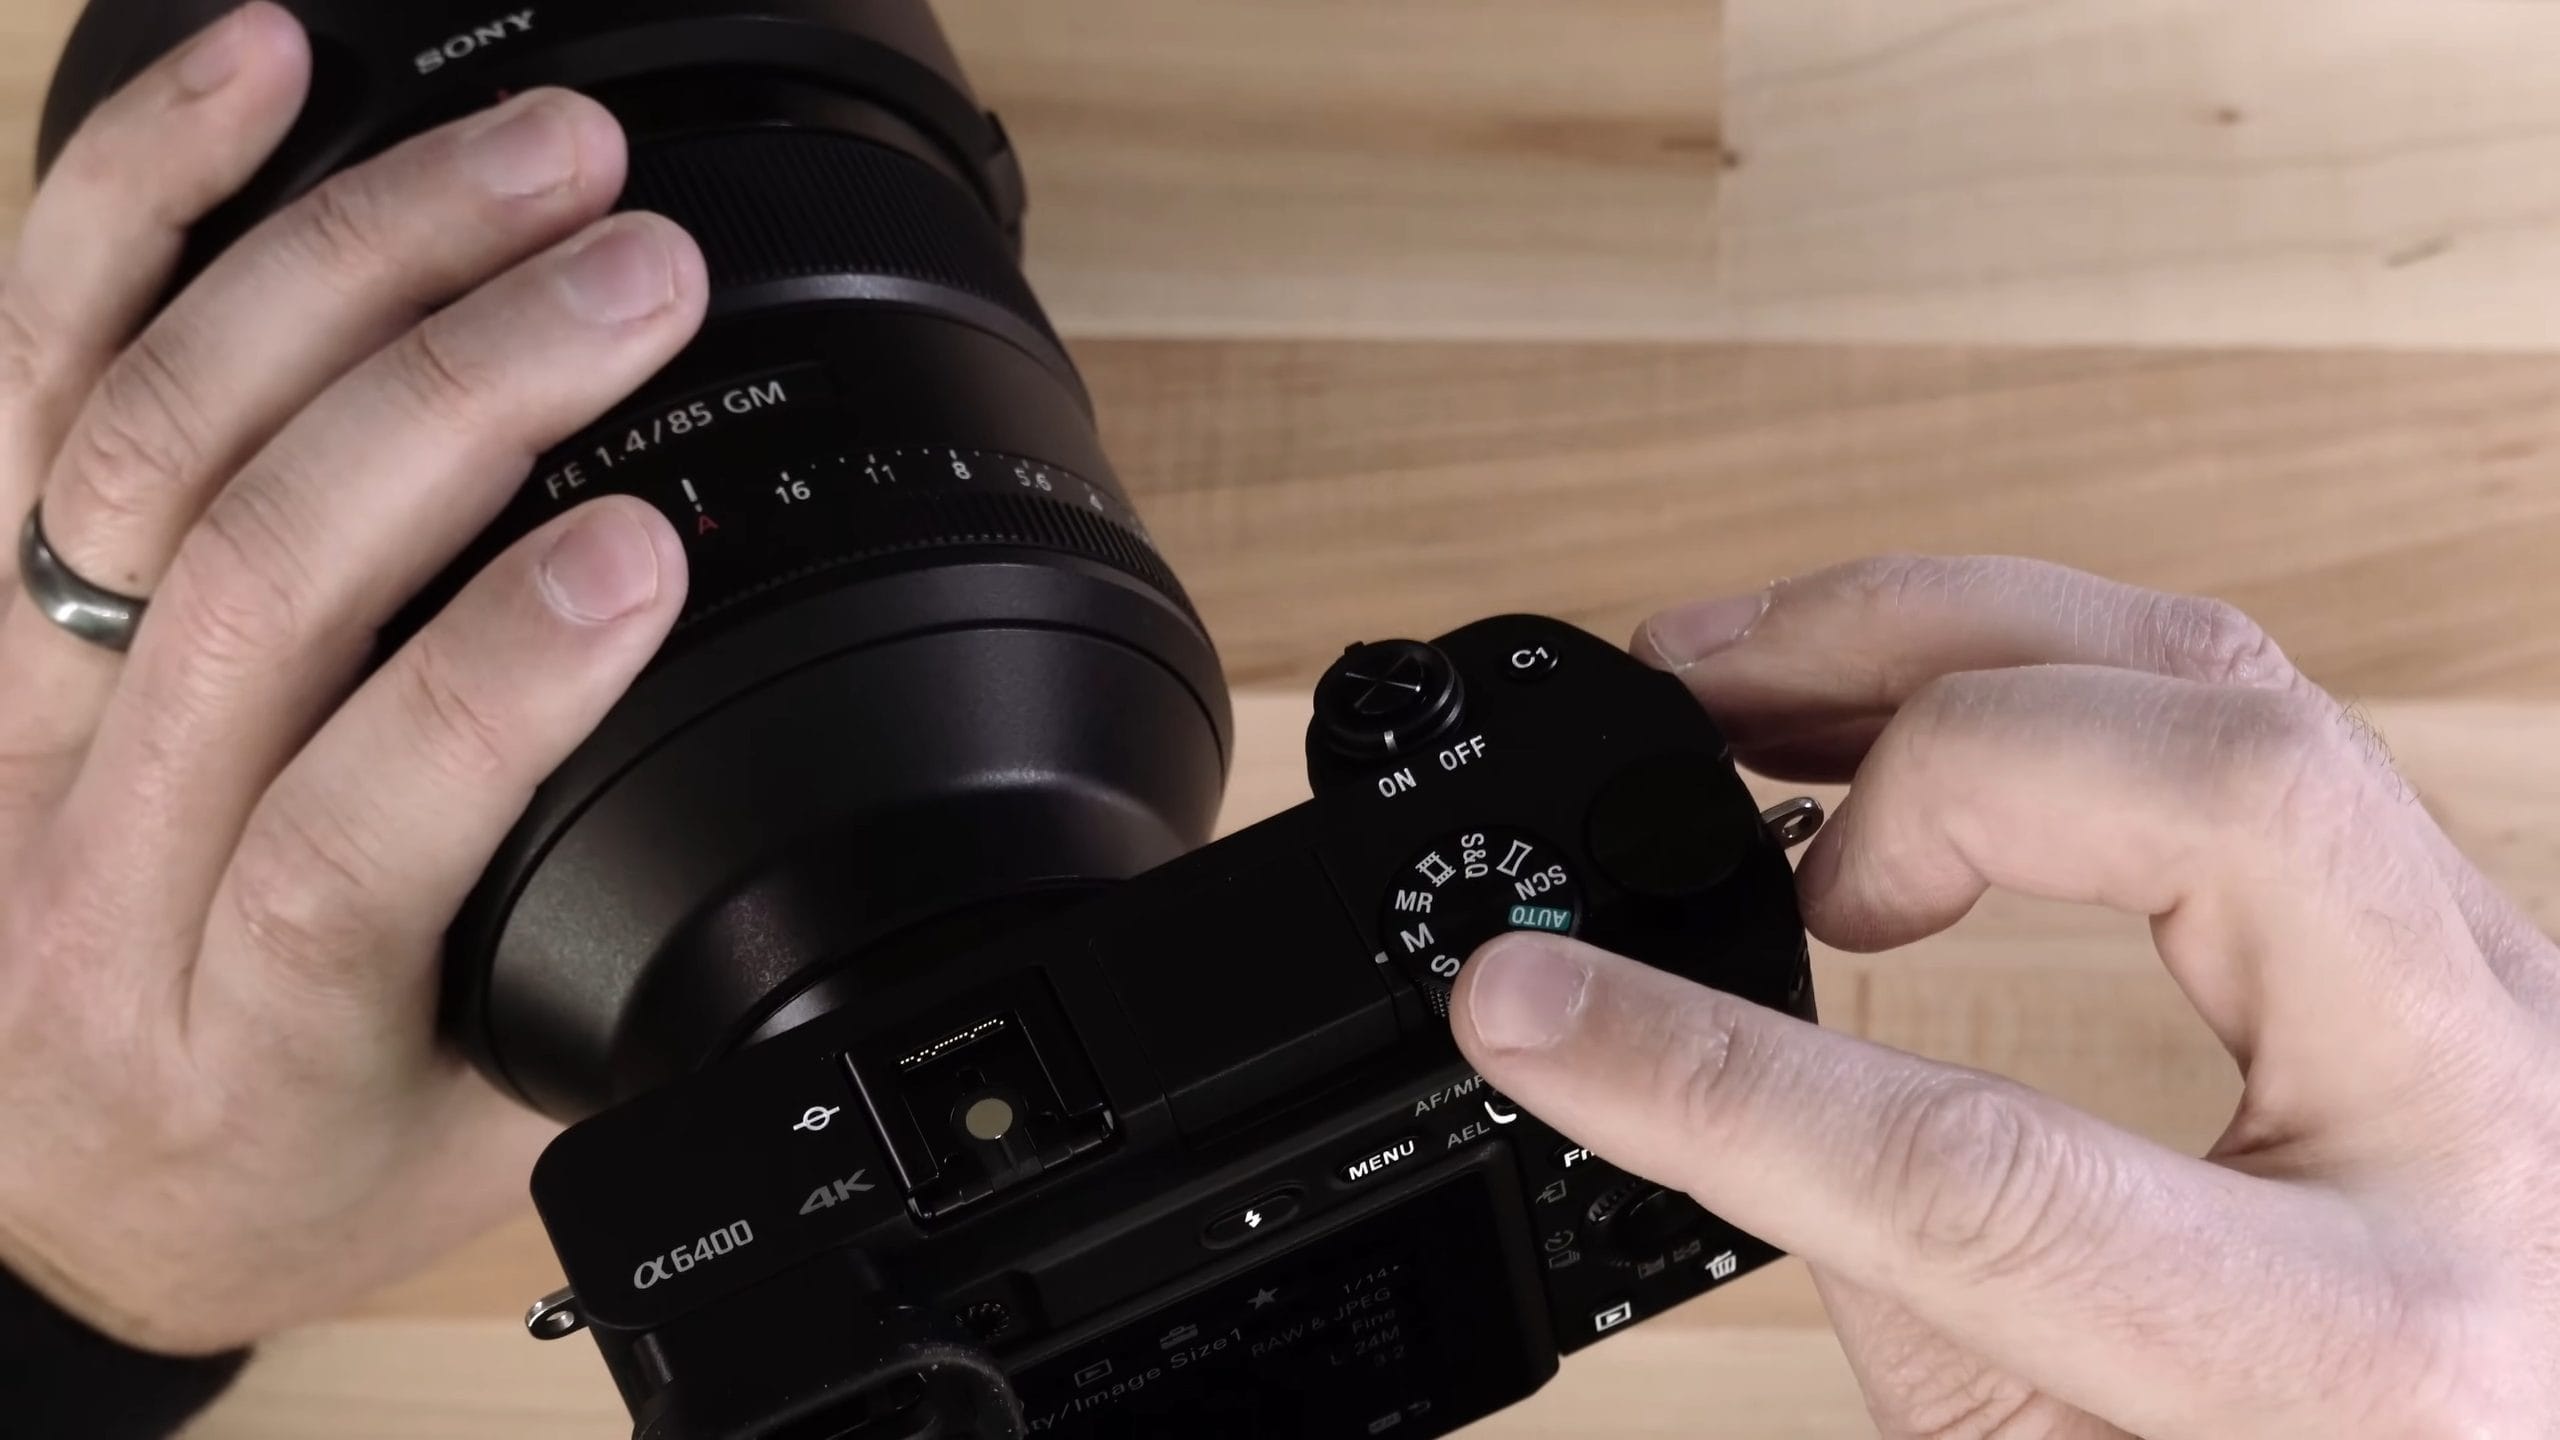
If you don’t quite understand manual mode yet, my free Ditch Auto course will help you understand it and how to shoot with it.
1. Shoot RAW & JPEG
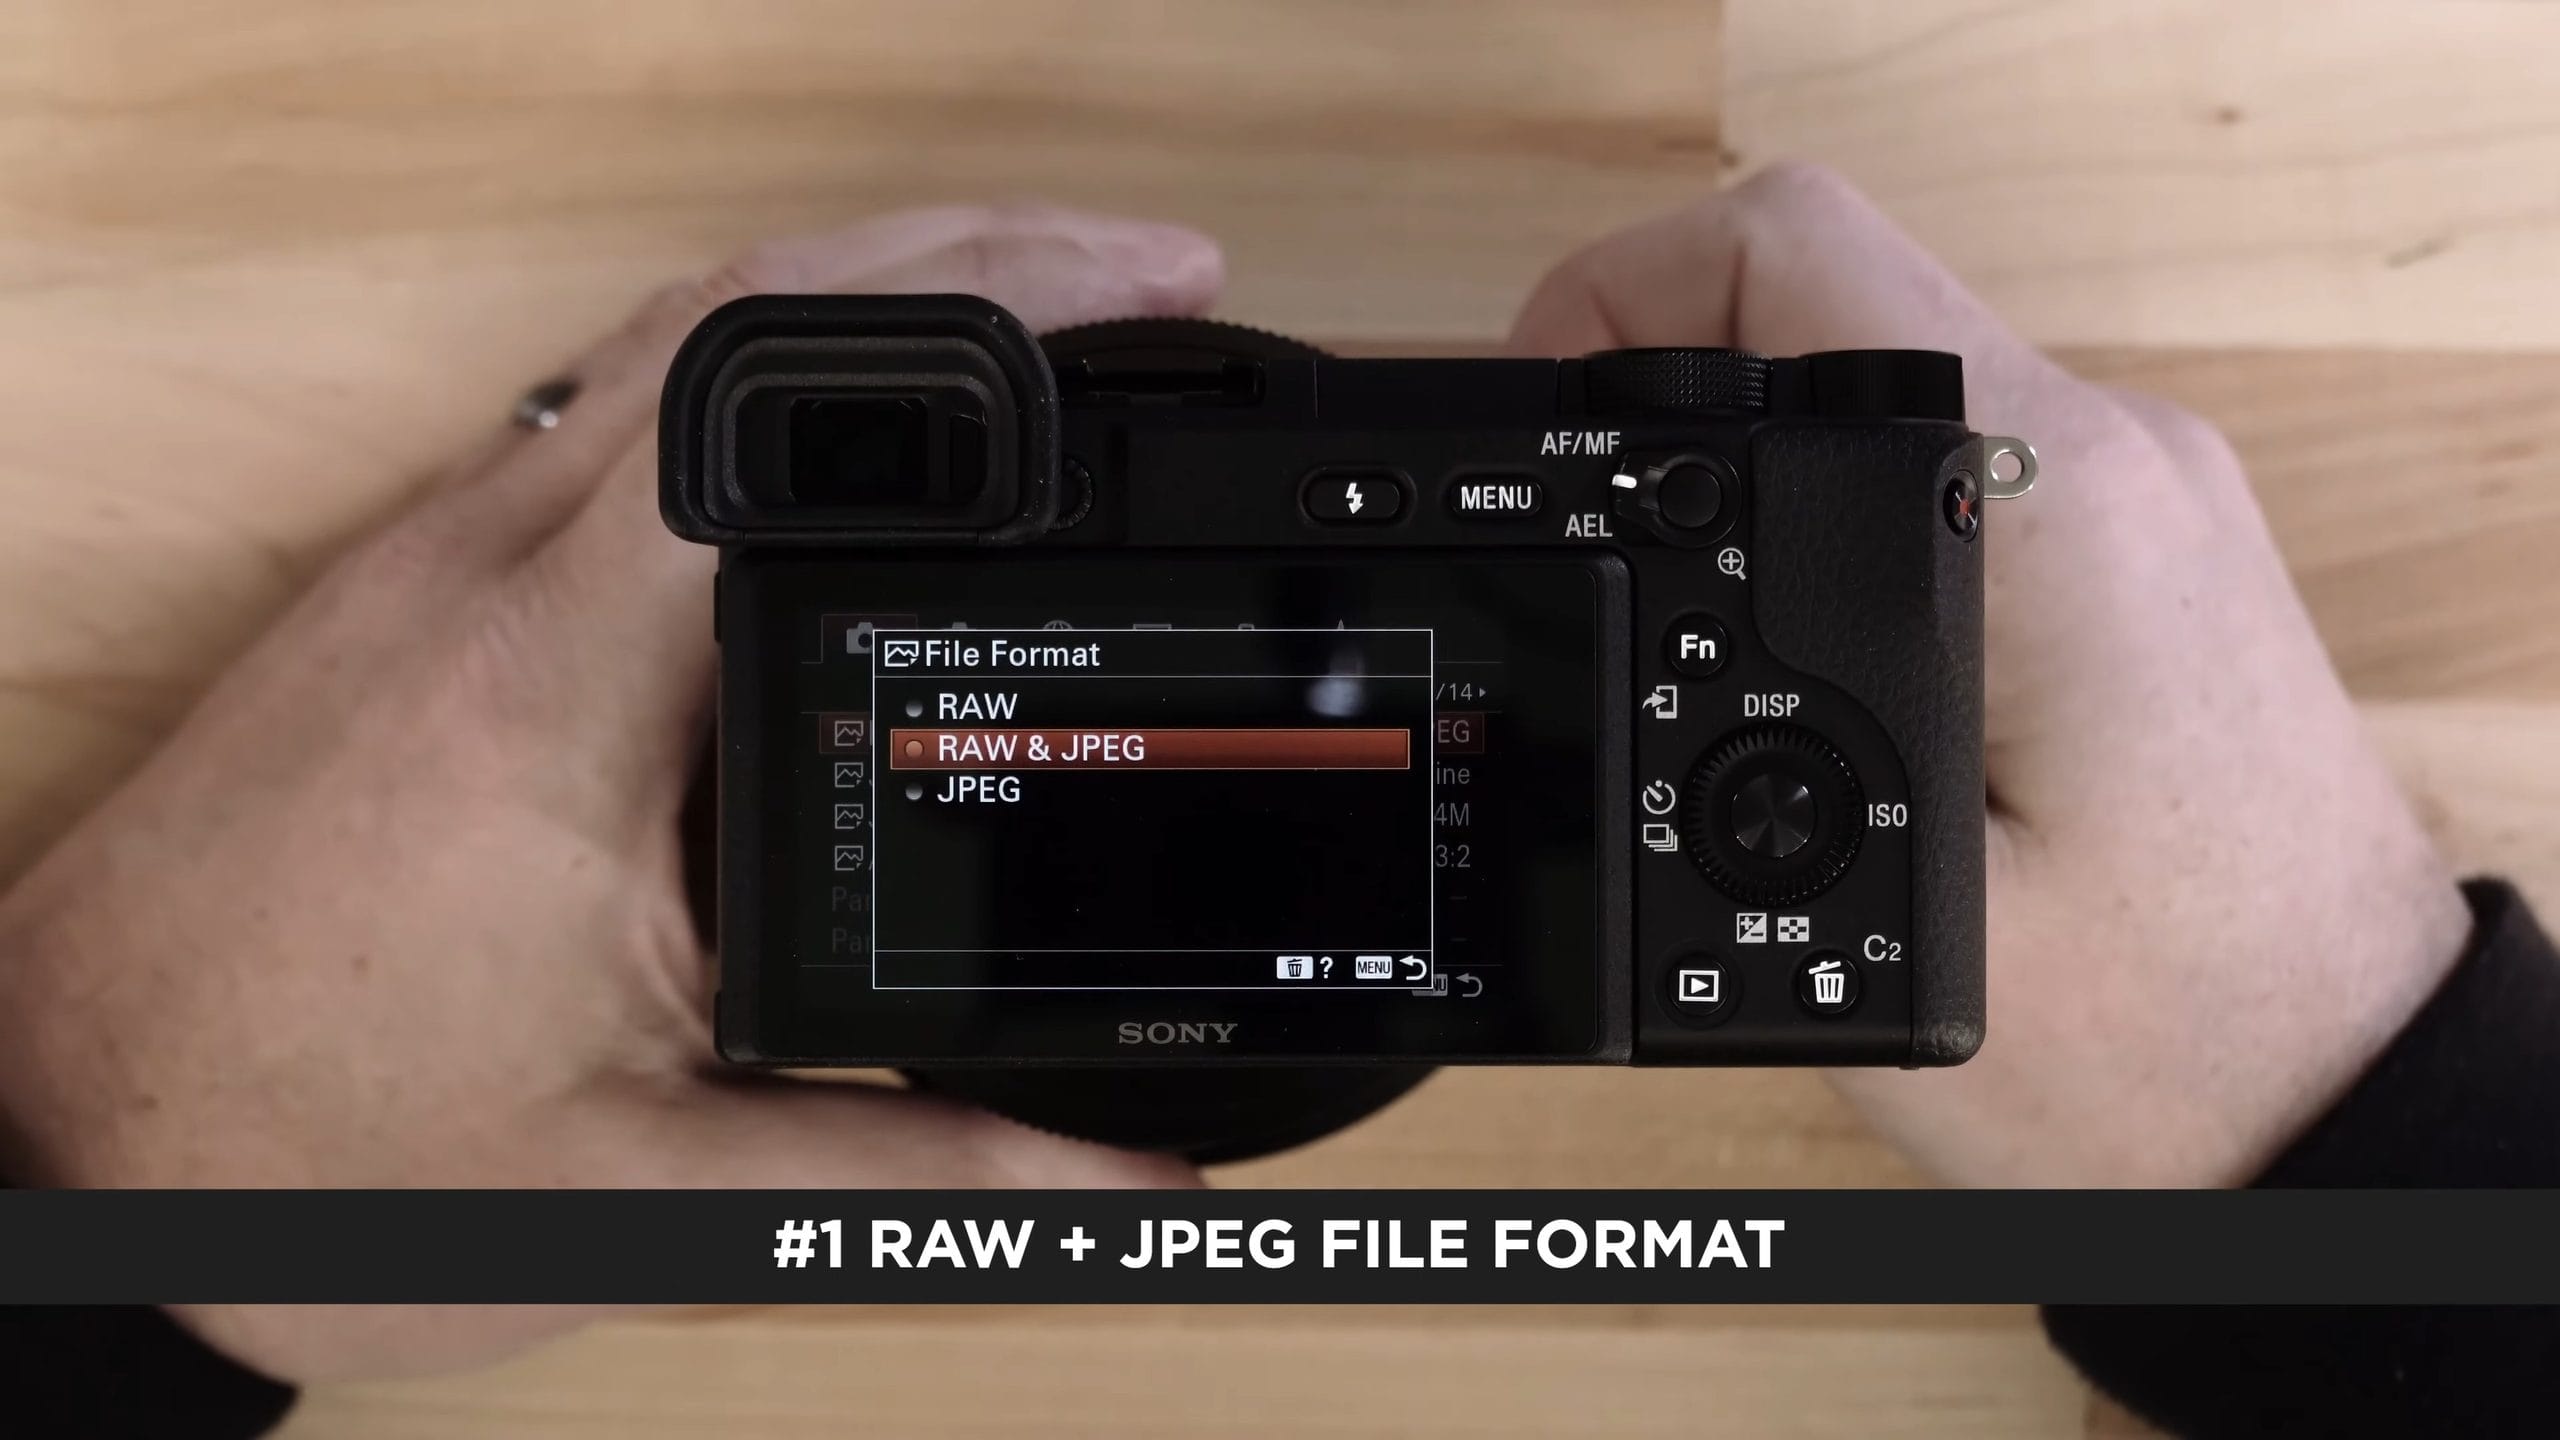
The first setting I change is putting the camera in RAW & JPEG. The RAW images are what I’m going to work with the most. They have a lot more data, so they’re a much better image to start with. You can fix white balance, change the exposure, and recover dark areas or bring down highlights much better than you can with a JPEG.
But I still like having the JPEGs, because of transferring images to my smartphone. The Sony app you use to send images from the camera to your phone only sends JPEGs. It doesn’t transfer the RAW file. So if you’re only shooting RAW, the camera has to convert it first. It’s not a big process, but it’s certainly faster to have the JPEGs ready to go. And if you want to do something quickly with your images, it’s much easier to copy JPEGs off a card than RAW files.
You’ll find it in MENU > Camera Settings1 > File Format.
2. Shoot Video in 4K
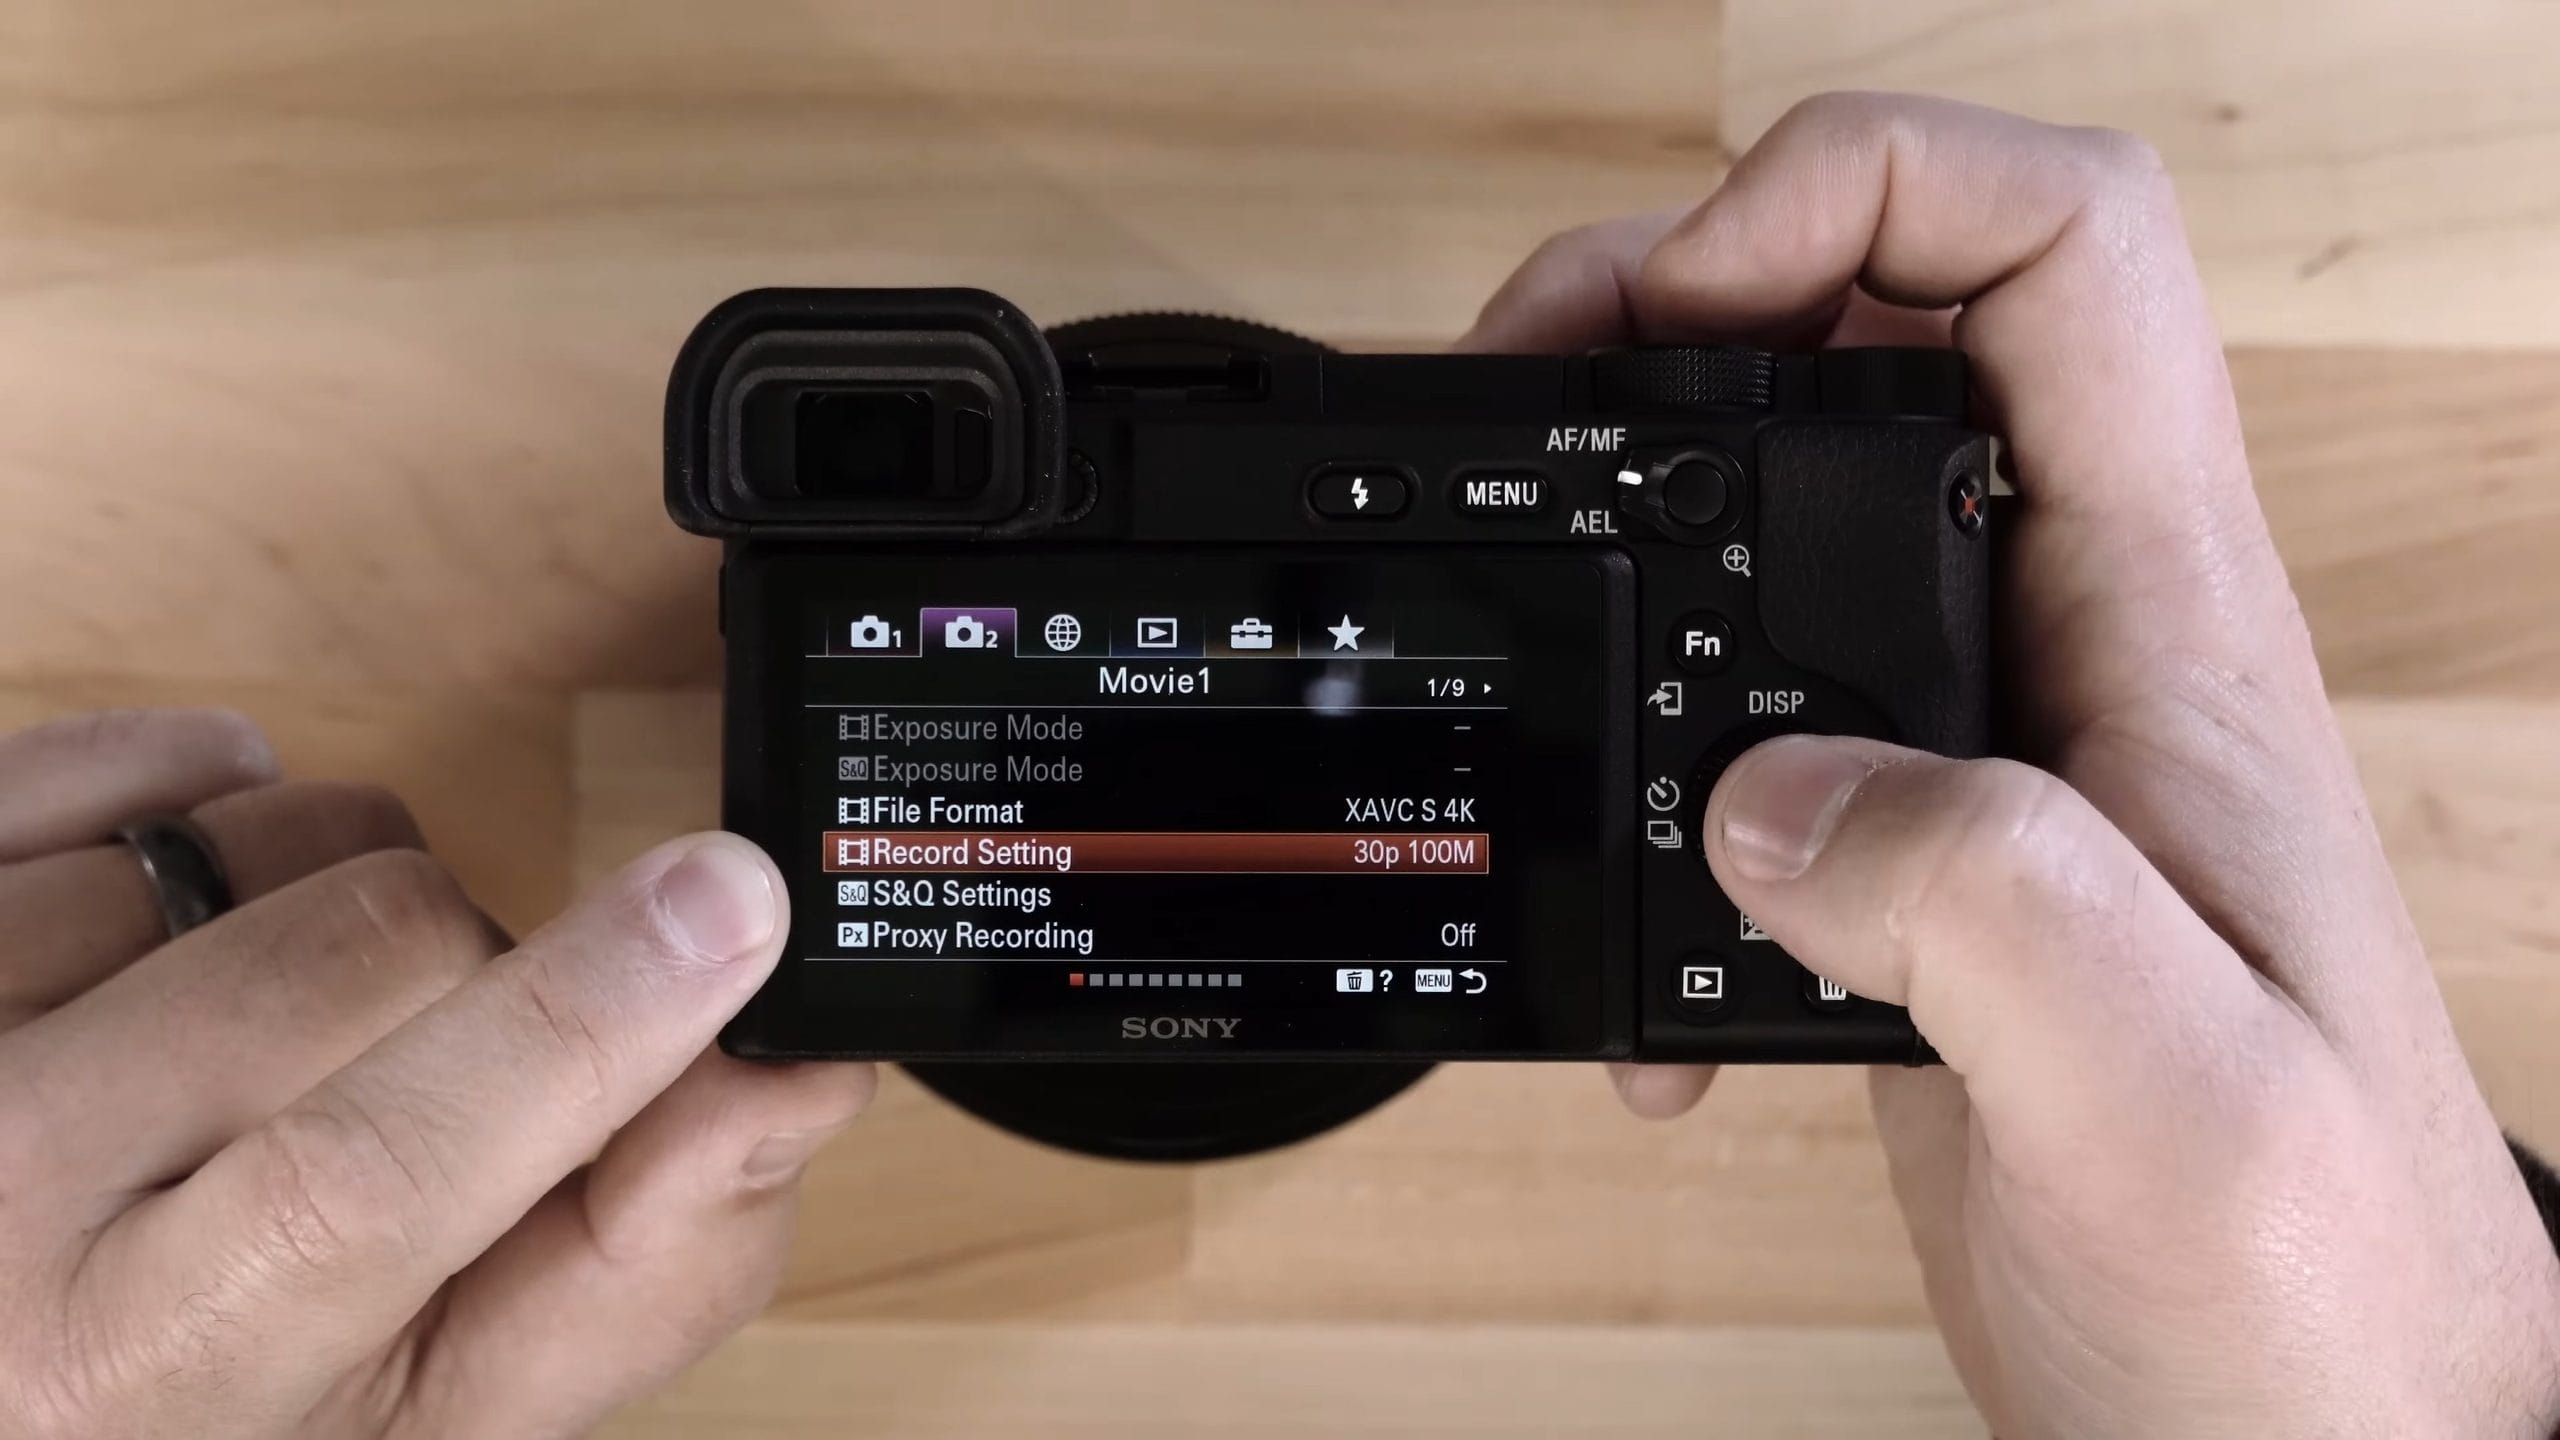
I do a lot of video, so the second thing I change is the video format. In the movie settings on the second tab, go down to File Format. Mine came set to XAVC S HD, which is HD. I like to shoot in 4K, so I switch it to XAVC S 4K. This camera is a monster at 4K. Absolutely fantastic.
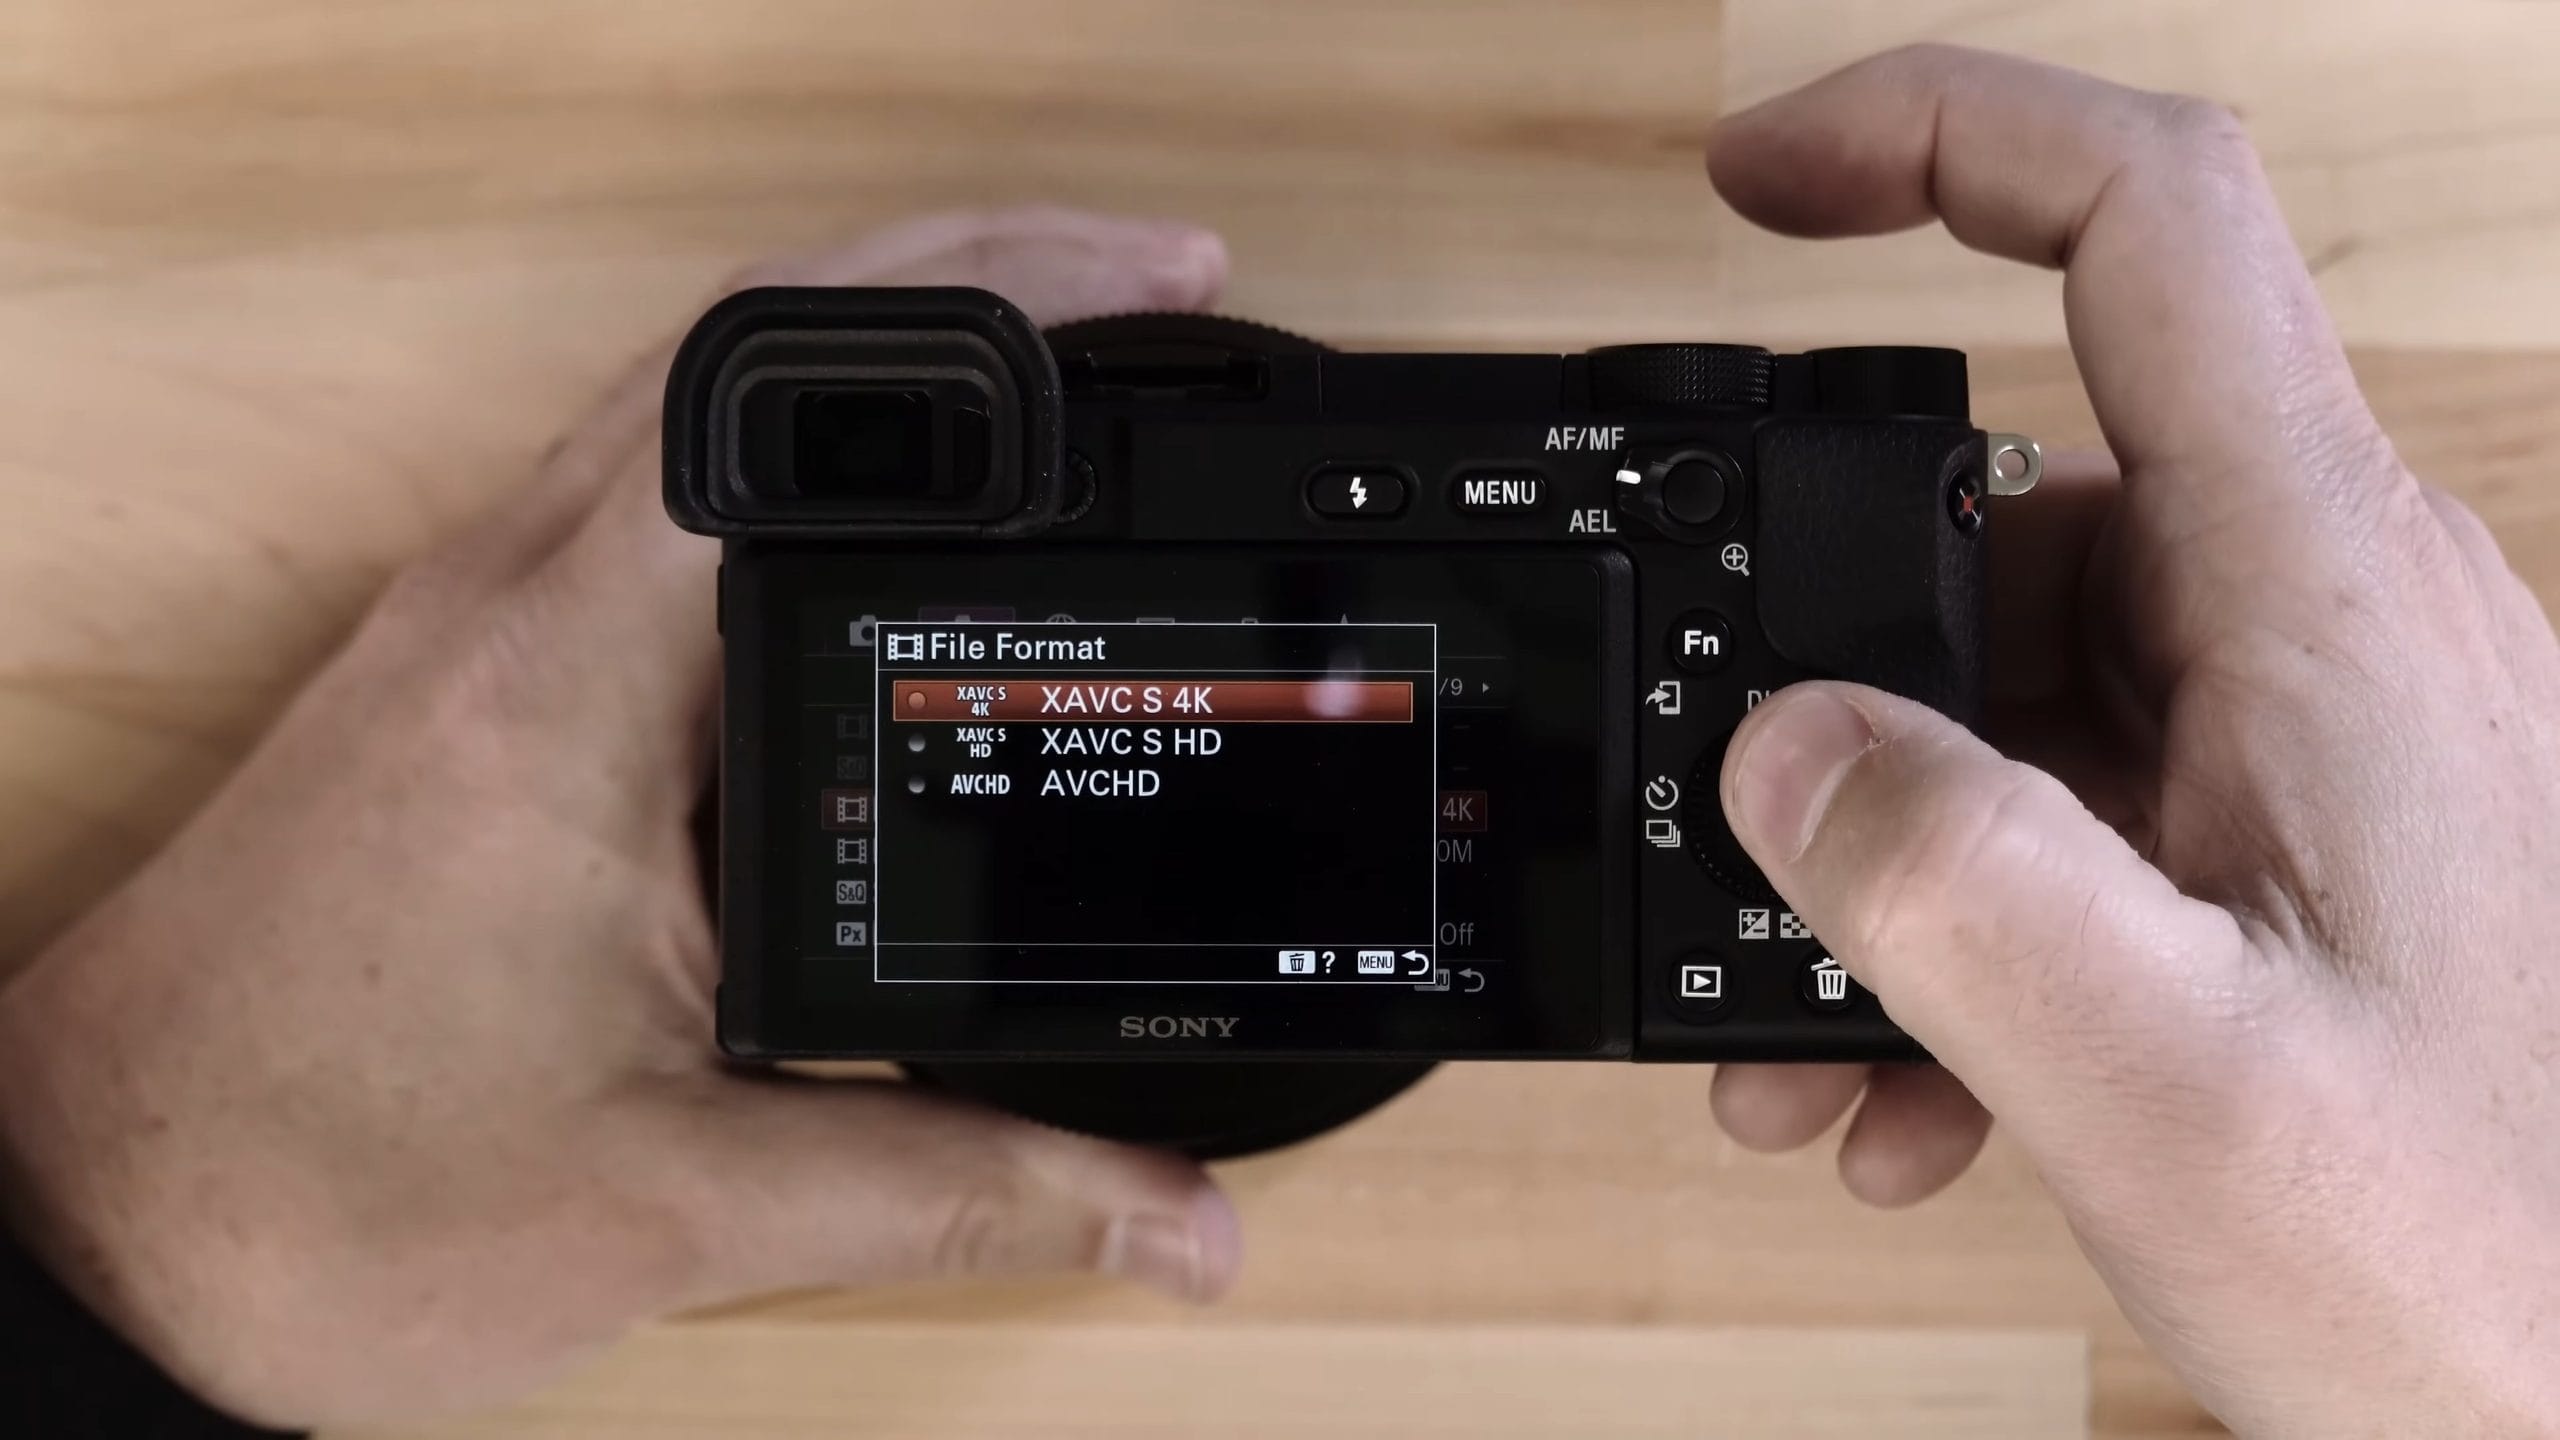
The only reasons you’d want to shoot HD are if you want smaller file sizes, or you want the slow-motion options like 120p. You won’t get 120p in 4K, and you won’t even get 60p. In 4K, you only have 30p and 24p, but that’s okay. I’d rather be shooting 4K. There’s also AVCHD, but there are very few options there, and it’s just a format I don’t really recommend. Sony’s XAVC S format is fantastic.
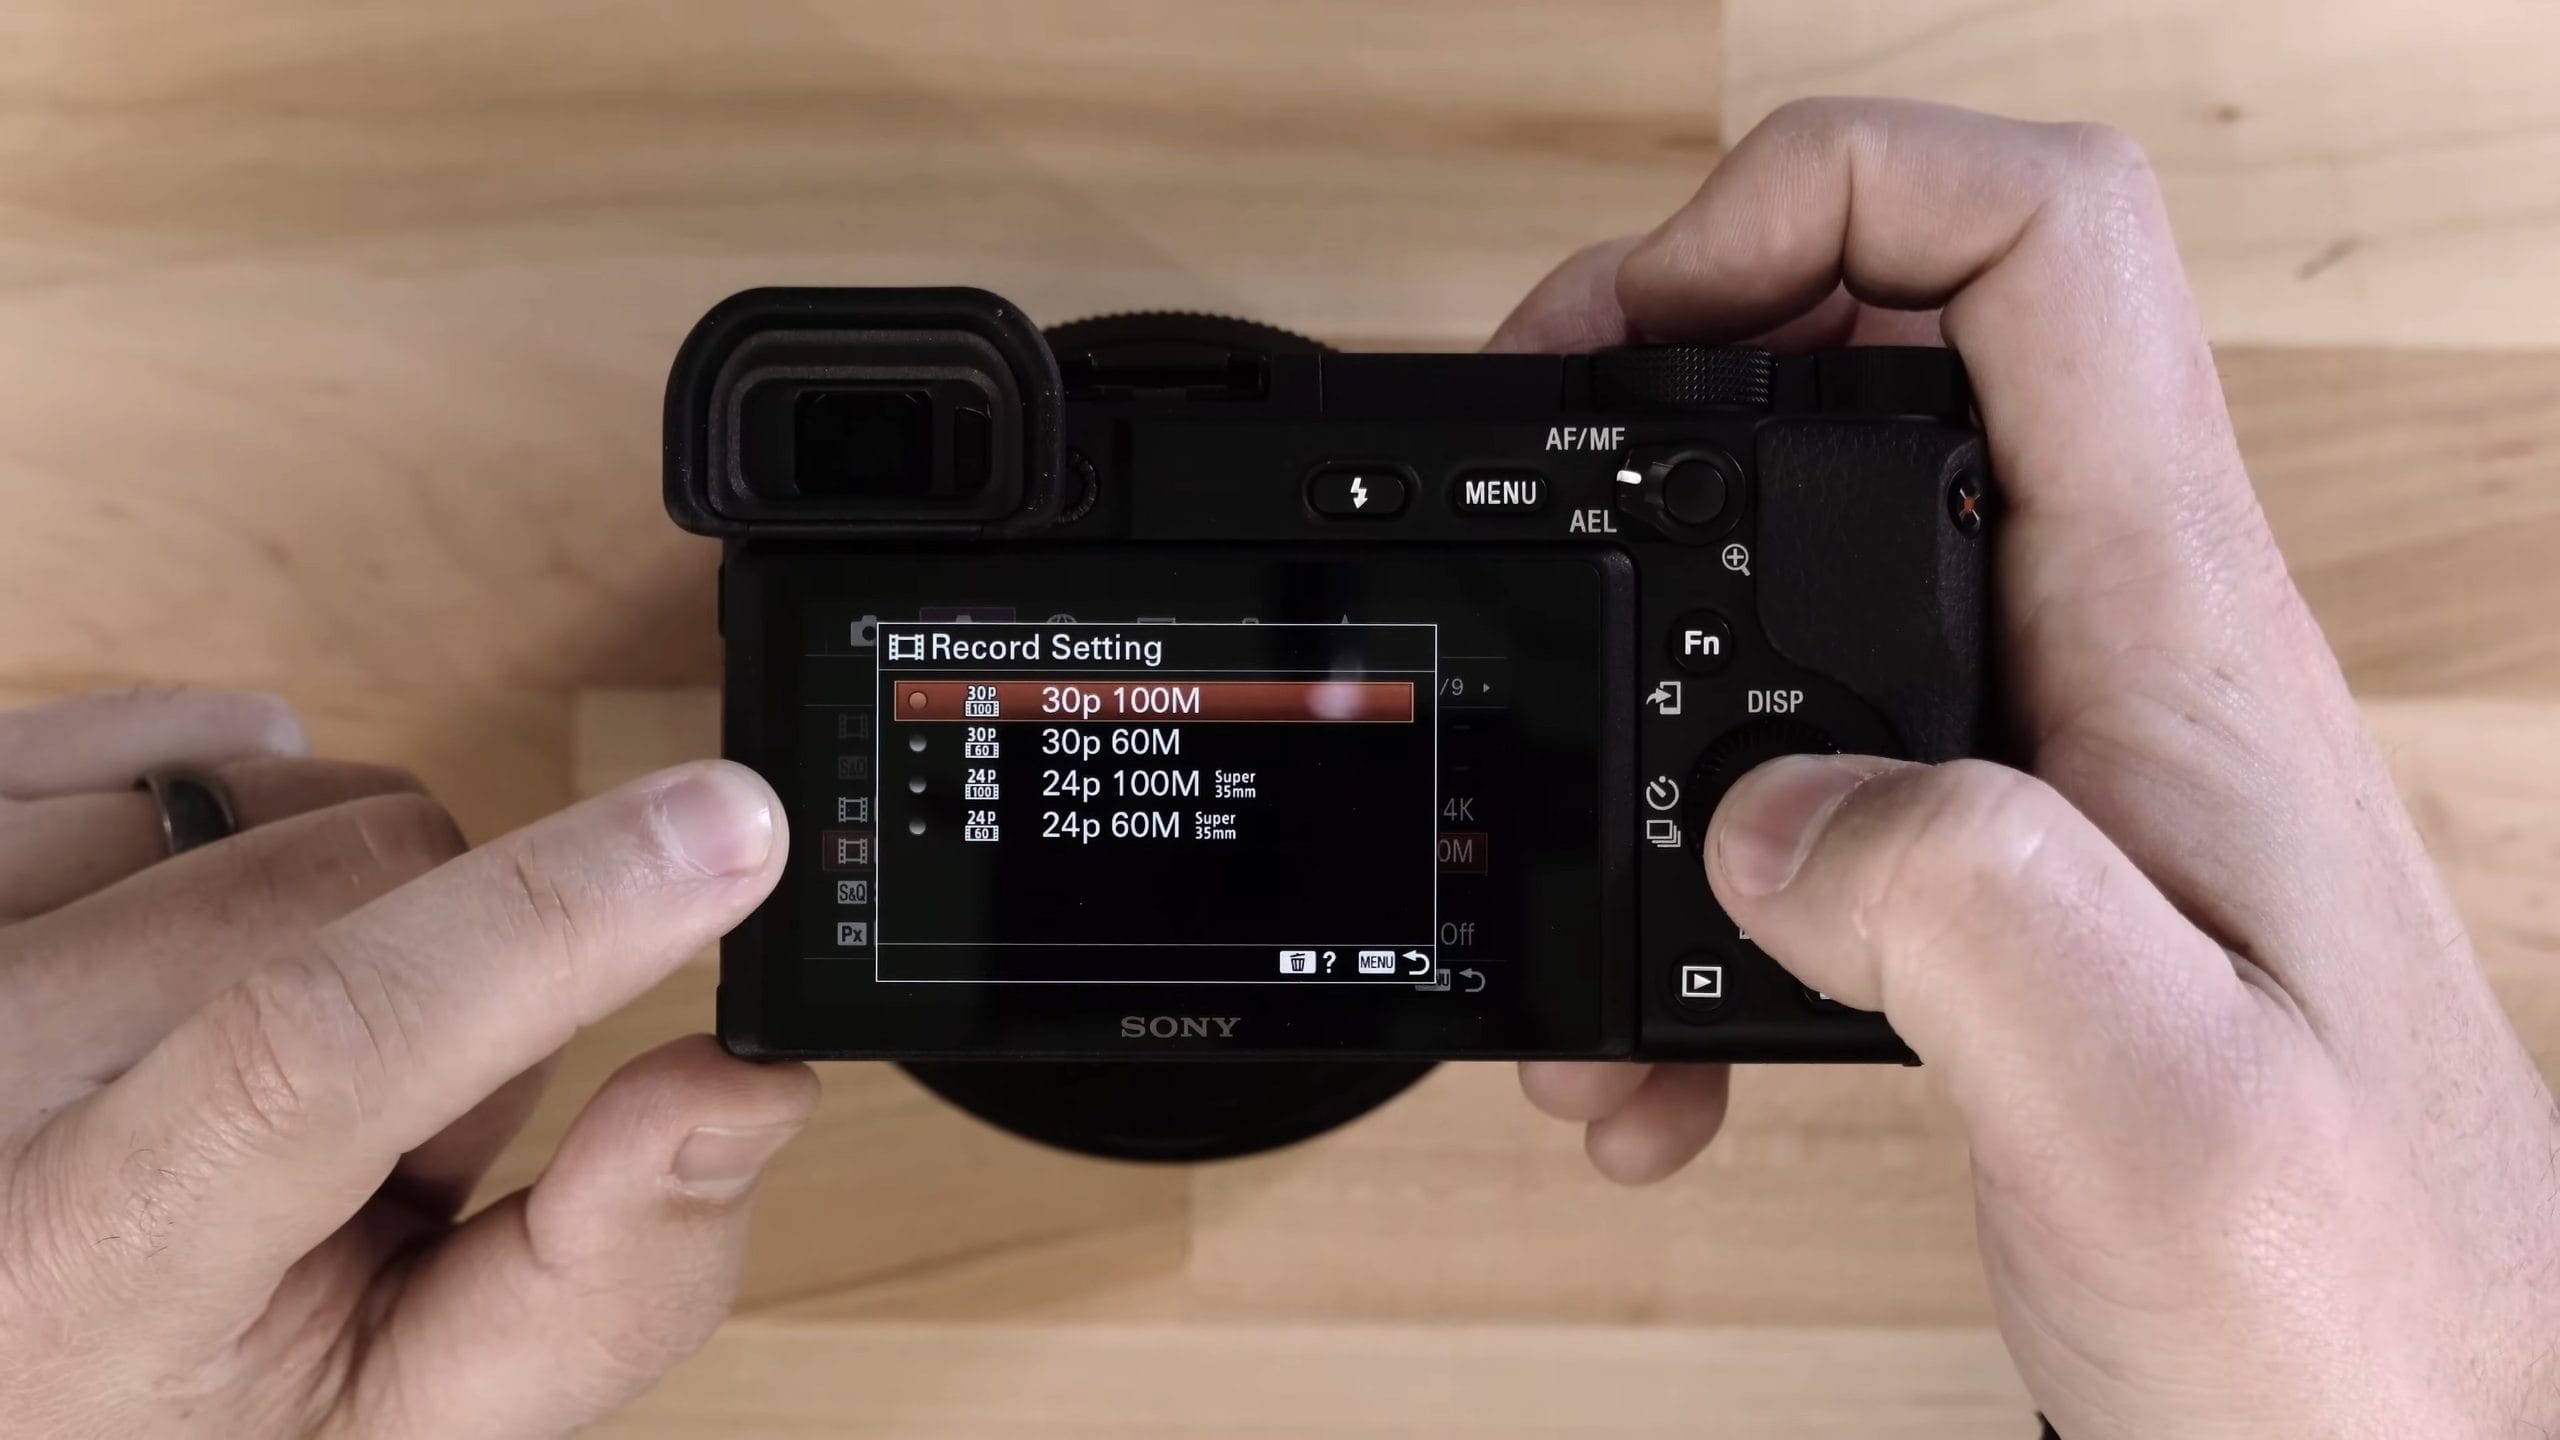
Then I set Record Setting to 30p 100M to get the most out of it I possibly can. This camera captures more than it needs and downsamples to 4K, and I’d rather have the least amount of processing done on my image as possible.
3. Pick the Right Focus Mode
The next setting is my autofocus mode. This one is situational, but I’m talking about it because I think it’s pretty important. Tap the Fn button and go over to Focus Mode. By default, the camera is set to AF-A, and there’s also AF-S, which is single-shot mode. I switch back and forth between those two depending on what I’m shooting.
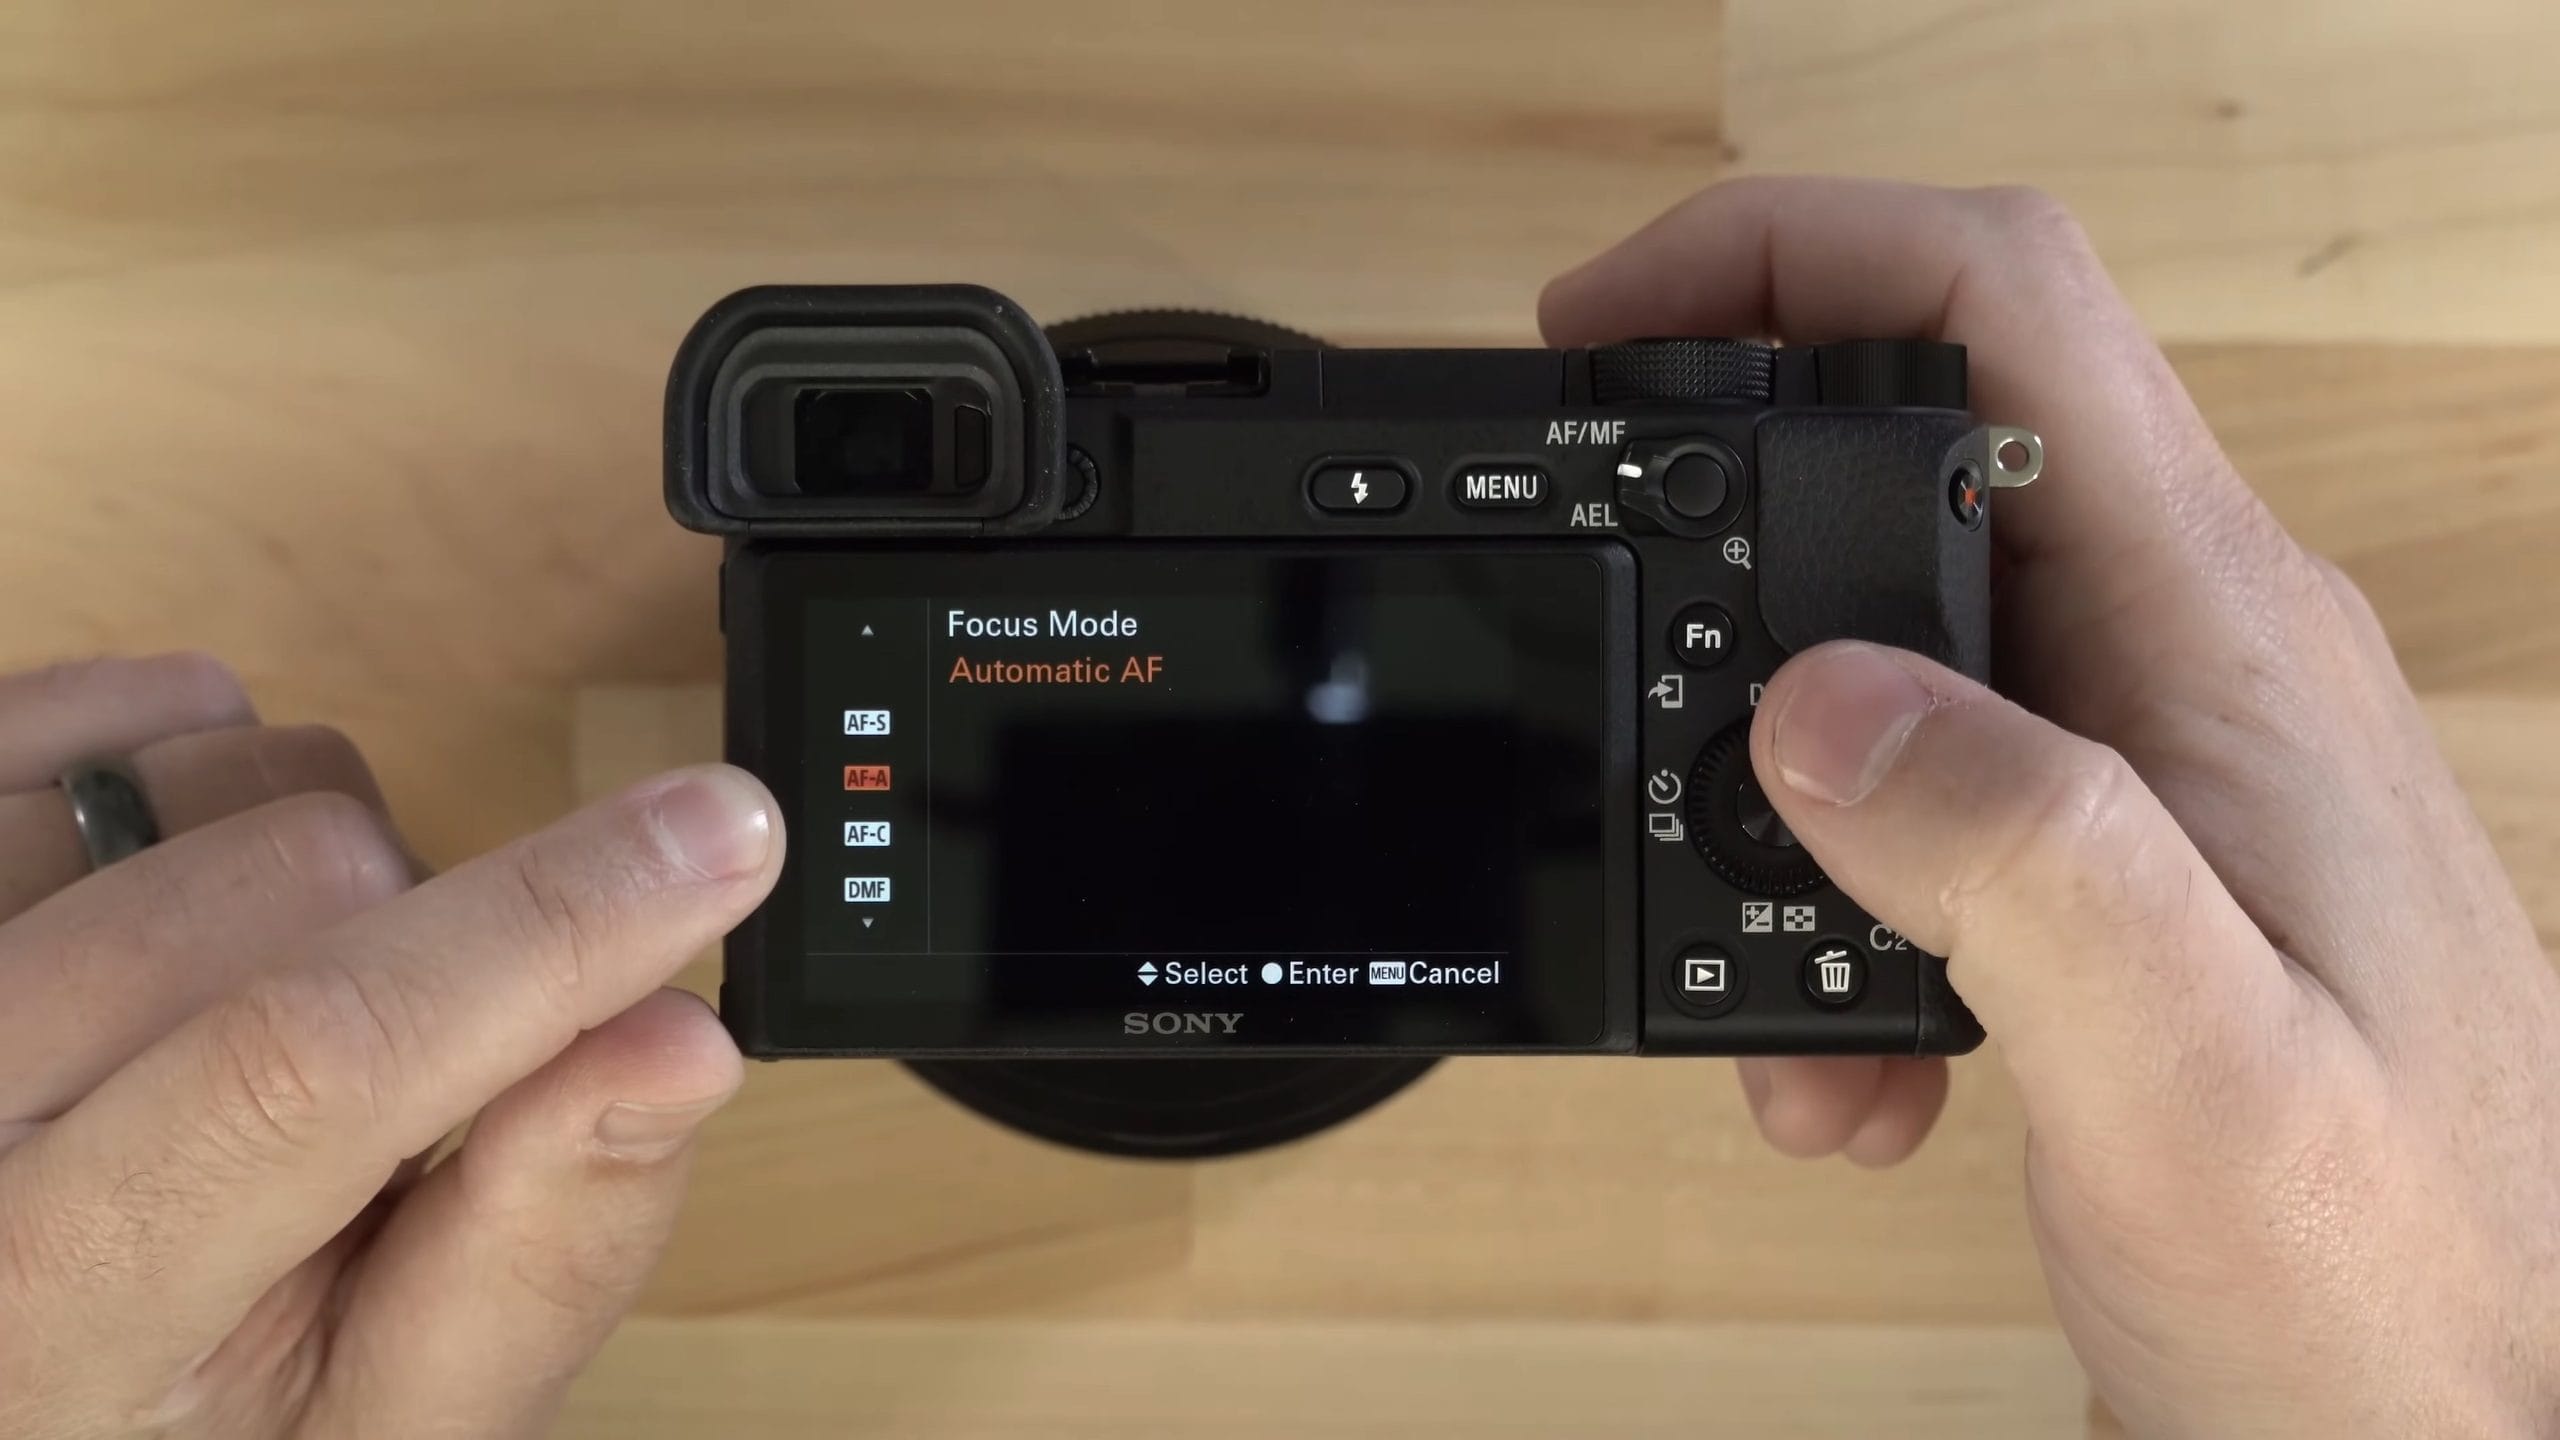
- AF-A is automatic. When I want autofocus to be more continuous, I use AF-A, and as long as I’m holding the shutter button down a little bit, it keeps searching and looking for focus.
- AF-S is for something that’s pretty stationary, where you don’t want the camera doing any crazy focusing or any of that voodoo magic this camera is known for. When you press the shutter button down, it grabs focus and stays there.
- AF-C is continuous, and it’s really best for video. When I’ve used AF-C for photos, the camera ends up really searching and spending a lot of time looking around. In my experience that uses your battery faster and makes the camera take a little longer to grab focus.
So I typically just use AF-C when I’m shooting video. AF-C has gotten better, and if you point it at something it’s not as bad. But continuous means the camera keeps trying to focus, and that can drain your battery. That’s probably my biggest concern there. So for photos, I leave it in AF-A.
4. Set Focus Area to Flexible Spot
The next thing I change is the way the camera looks for a subject to focus on. Most of the time I’m taking pictures of people, or I want a specific area in focus. This camera has gotten much better at taking pictures of people because it has that eye detection autofocus, which is amazing.
But what if you’re taking a picture of a group of people and you want to choose which person to focus on? Or you want to focus on something that’s not a face, like a building or a point of interest? I’m often doing that, and I want a little more flexibility than having the entire screen available for the camera to focus on whatever it sees fit.
So I press the Fn button, go one over from Focus Mode to Focus Area, and set it to Flexible Spot. That gives me a flexible spot I can tap on and move all around. Basically, whatever is inside that box is what it’s going to focus on.
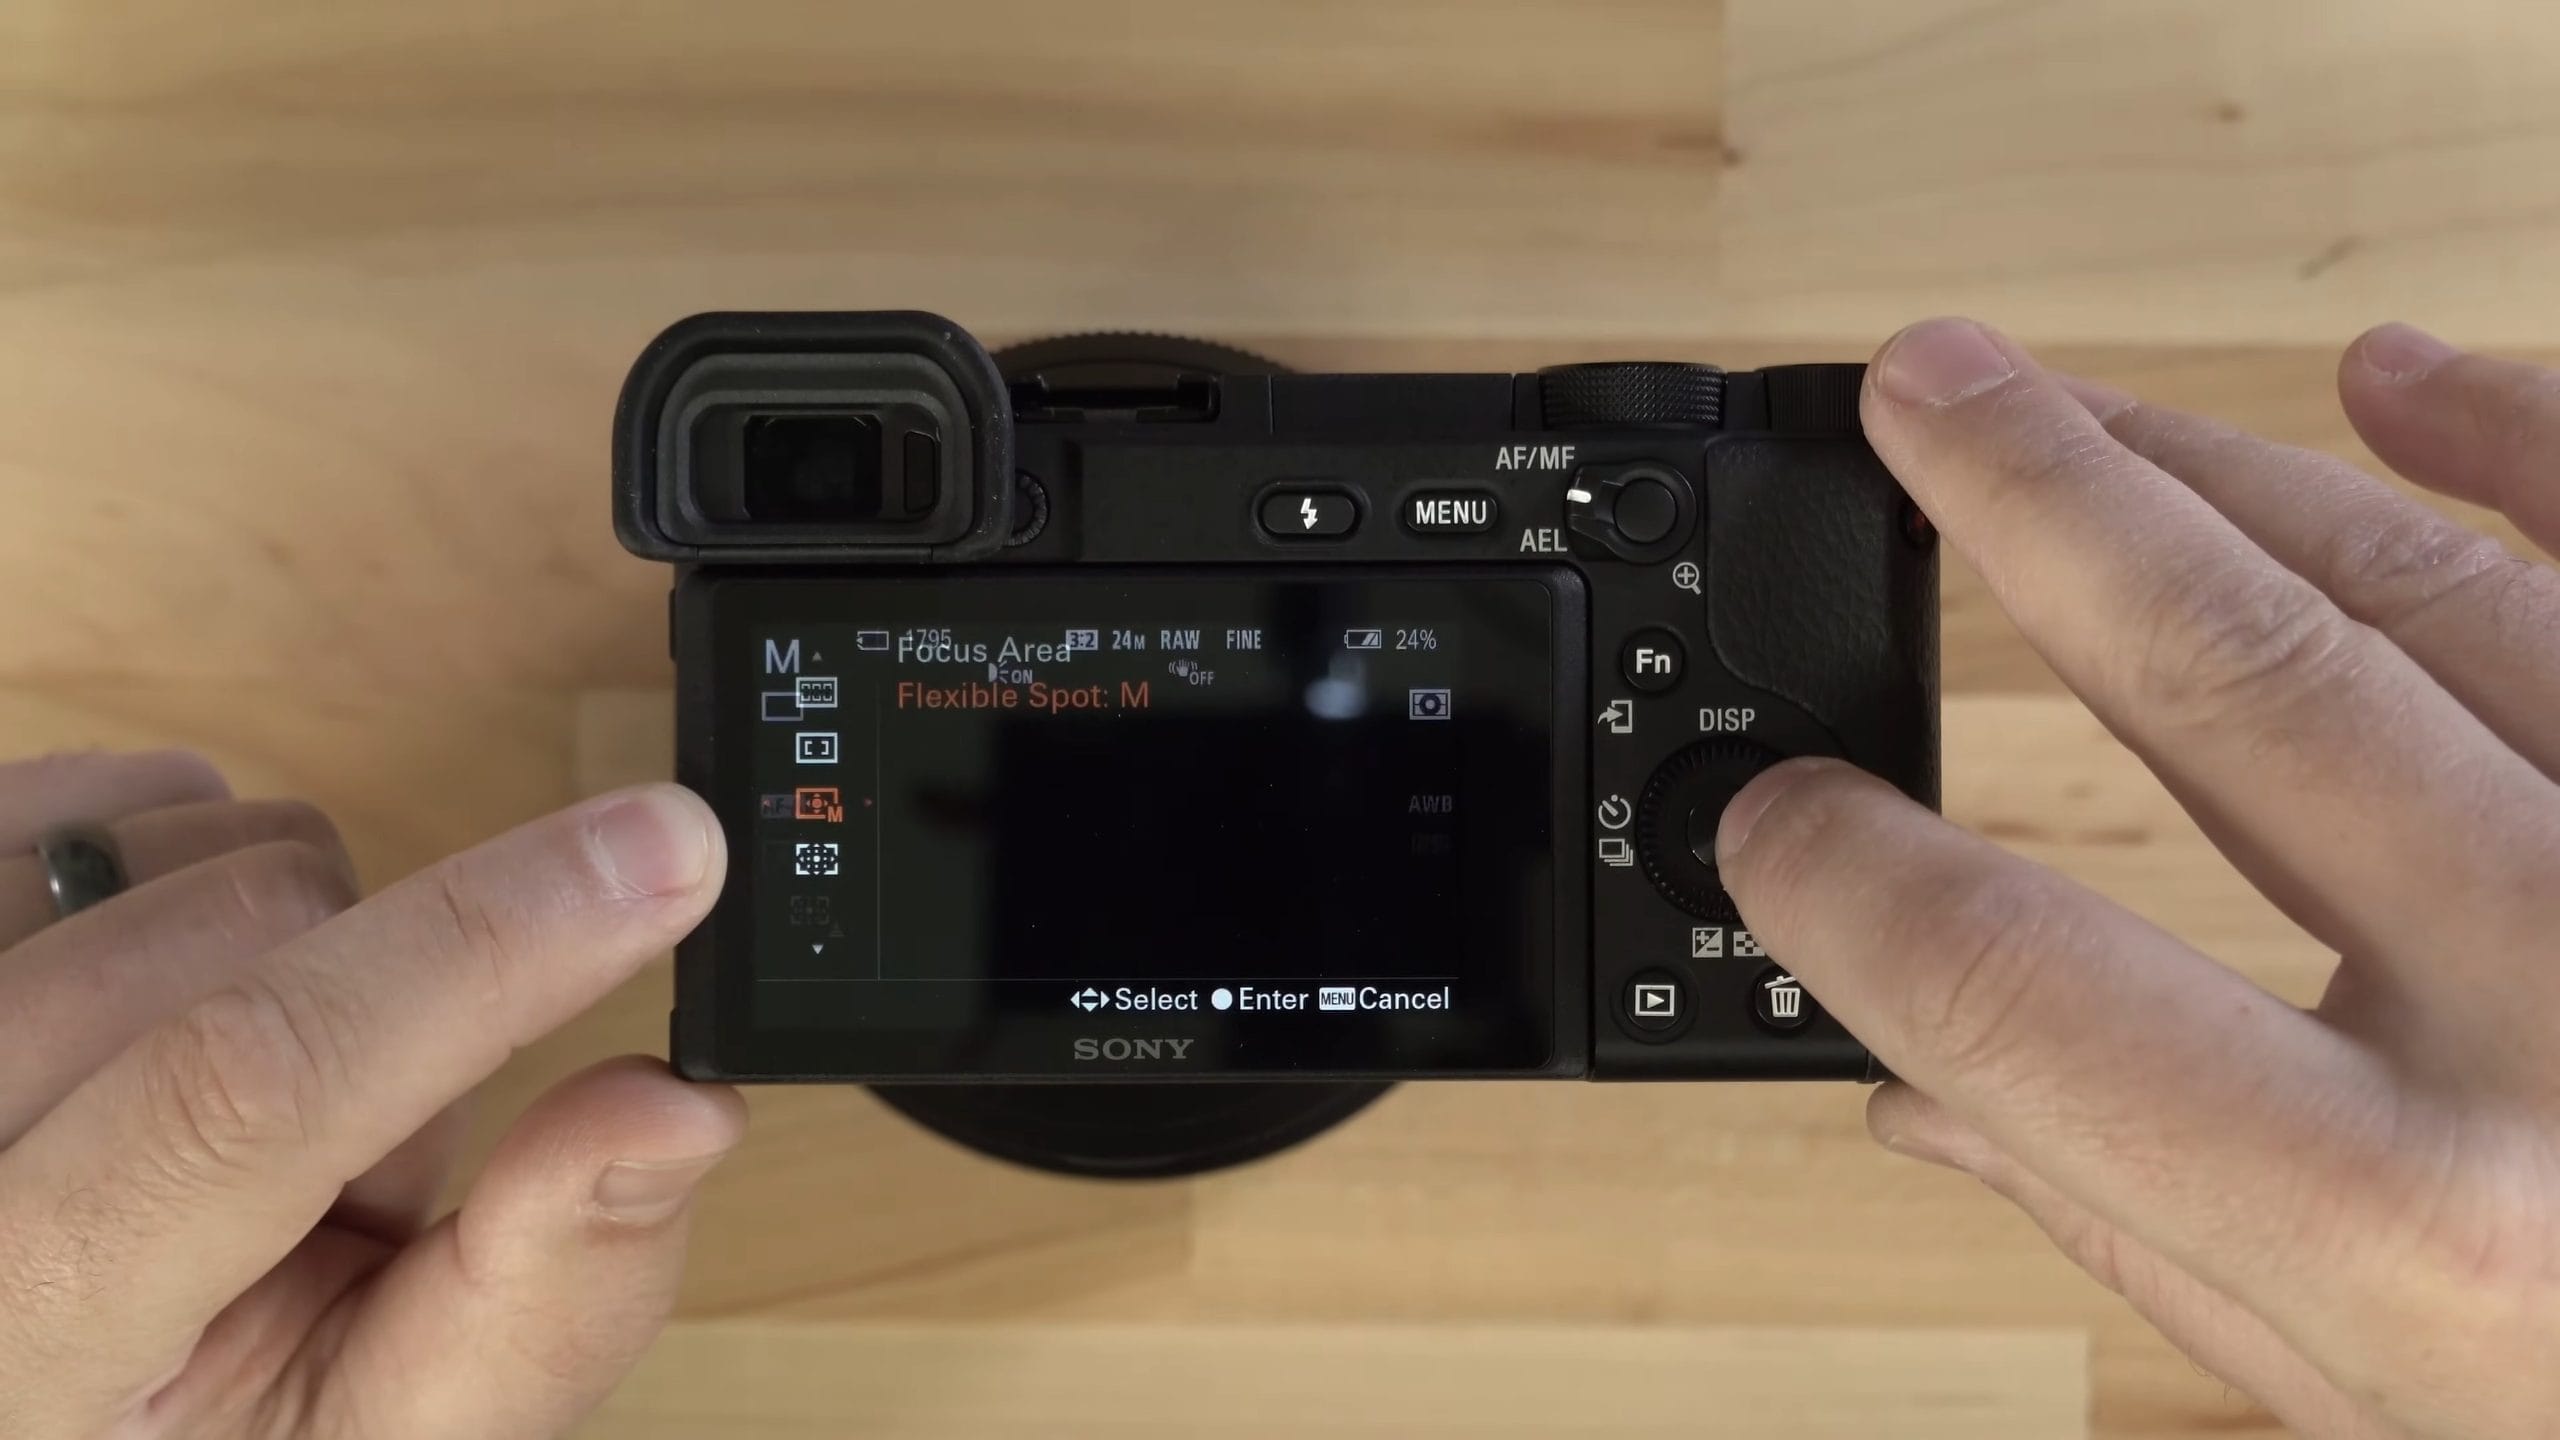
That’s good for me because I don’t want the camera looking at the entire sensor and thinking maybe it’s that thing up in the corner, or a person in the background. If you want to focus on the scene but there are people in the background, the camera is going to have a hard time choosing something that’s not a person. With Flexible Spot, I’m forcing it to only look in the area I want, and it’s really quick, because most of the time I’m using this smaller camera with the back screen, not the viewfinder, and I can just tap the box where I want it.
5. Put Focus Standard on the Center Button
When you’re using the back screen, you can simply tap around. You can even drag your finger across the screen while you’re looking through the viewfinder, which is just magical. But because your face is so close to everything, it’s hard to get your thumb in there with your eye up against the viewfinder. When I try it, my nose is in the way, and I lose the last third of the frame because I can’t get past it.
So I map the center button to Focus Standard. Press it, move the focus point around with the control wheel, and press it again to confirm where you want the focus point to be. That’s how you used to have to do it on older cameras before touchscreens, and by default there’s no way to do it on this camera until you set it up. If you’ve ever played video games, you’re going to be really quick at this, and it’s probably the best way to move your focus point around with your eye to the viewfinder.
How to Set It
- Press MENU, go to Camera Settings2, and scroll almost to the last page to Custom Key.
- The screen shows a picture of the camera with the button you’re changing highlighted. Find the Center Button.
- Change it to Focus Standard, which is in the AF1 group.
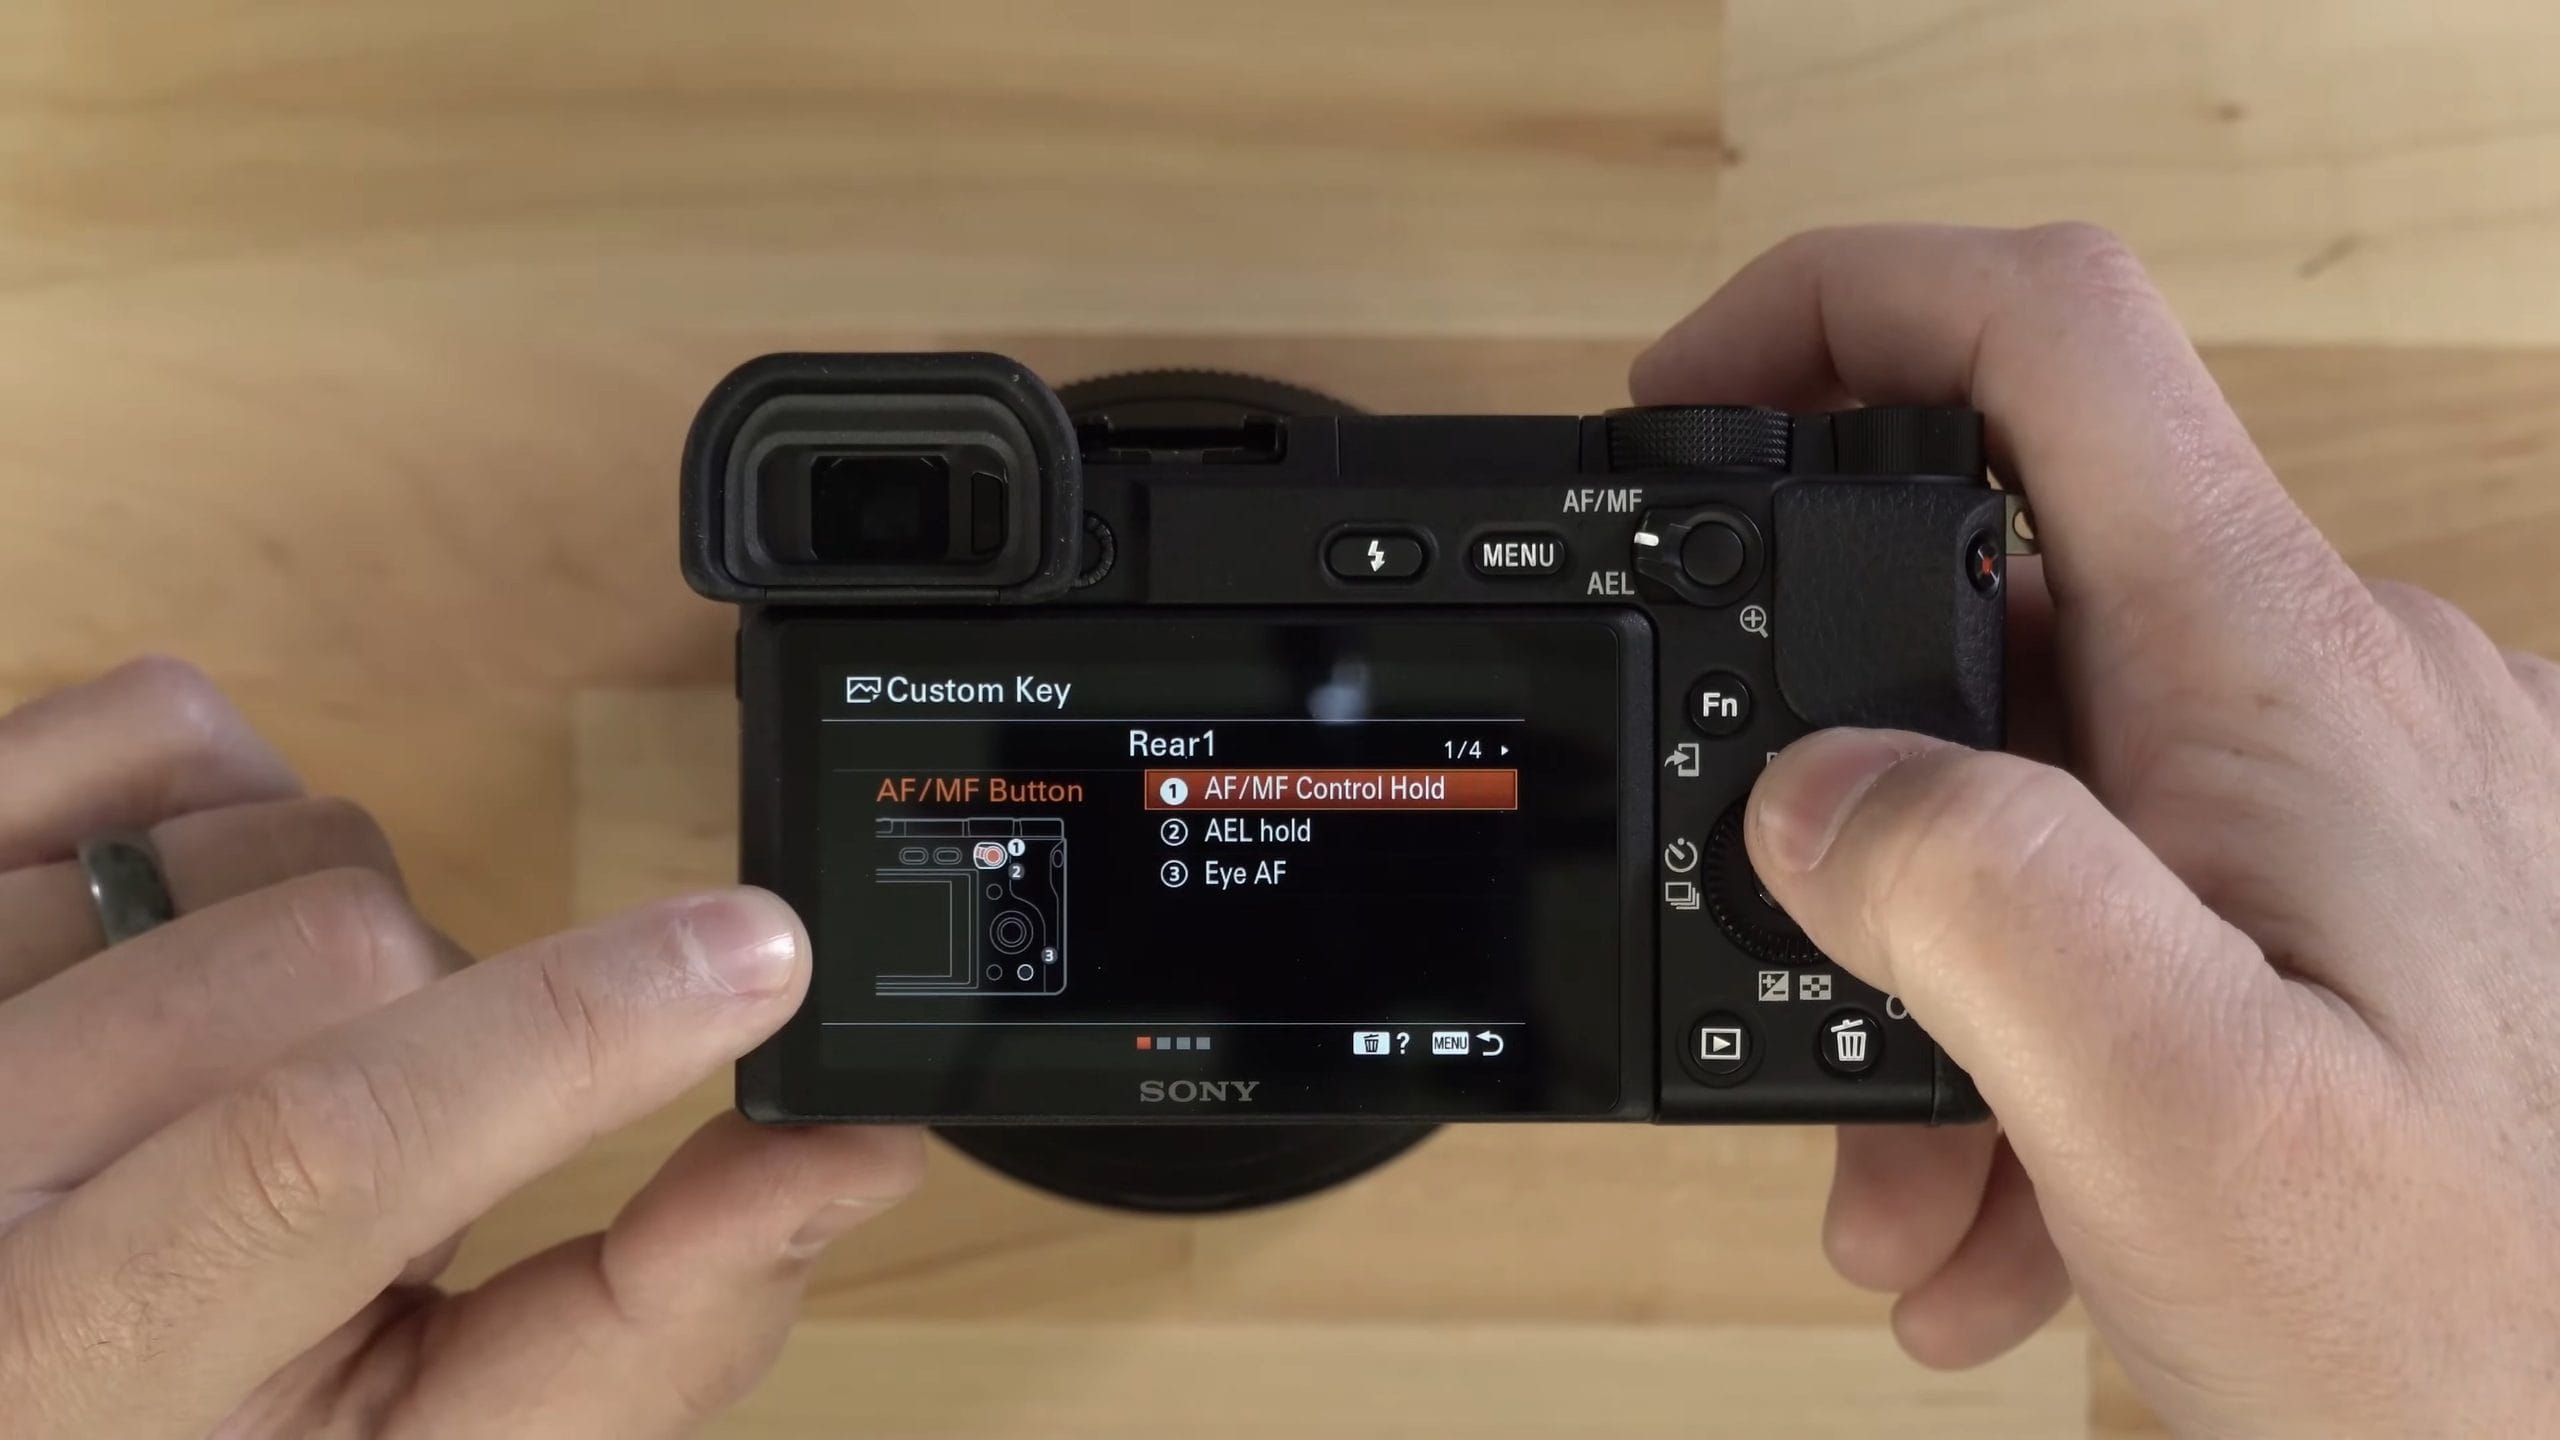
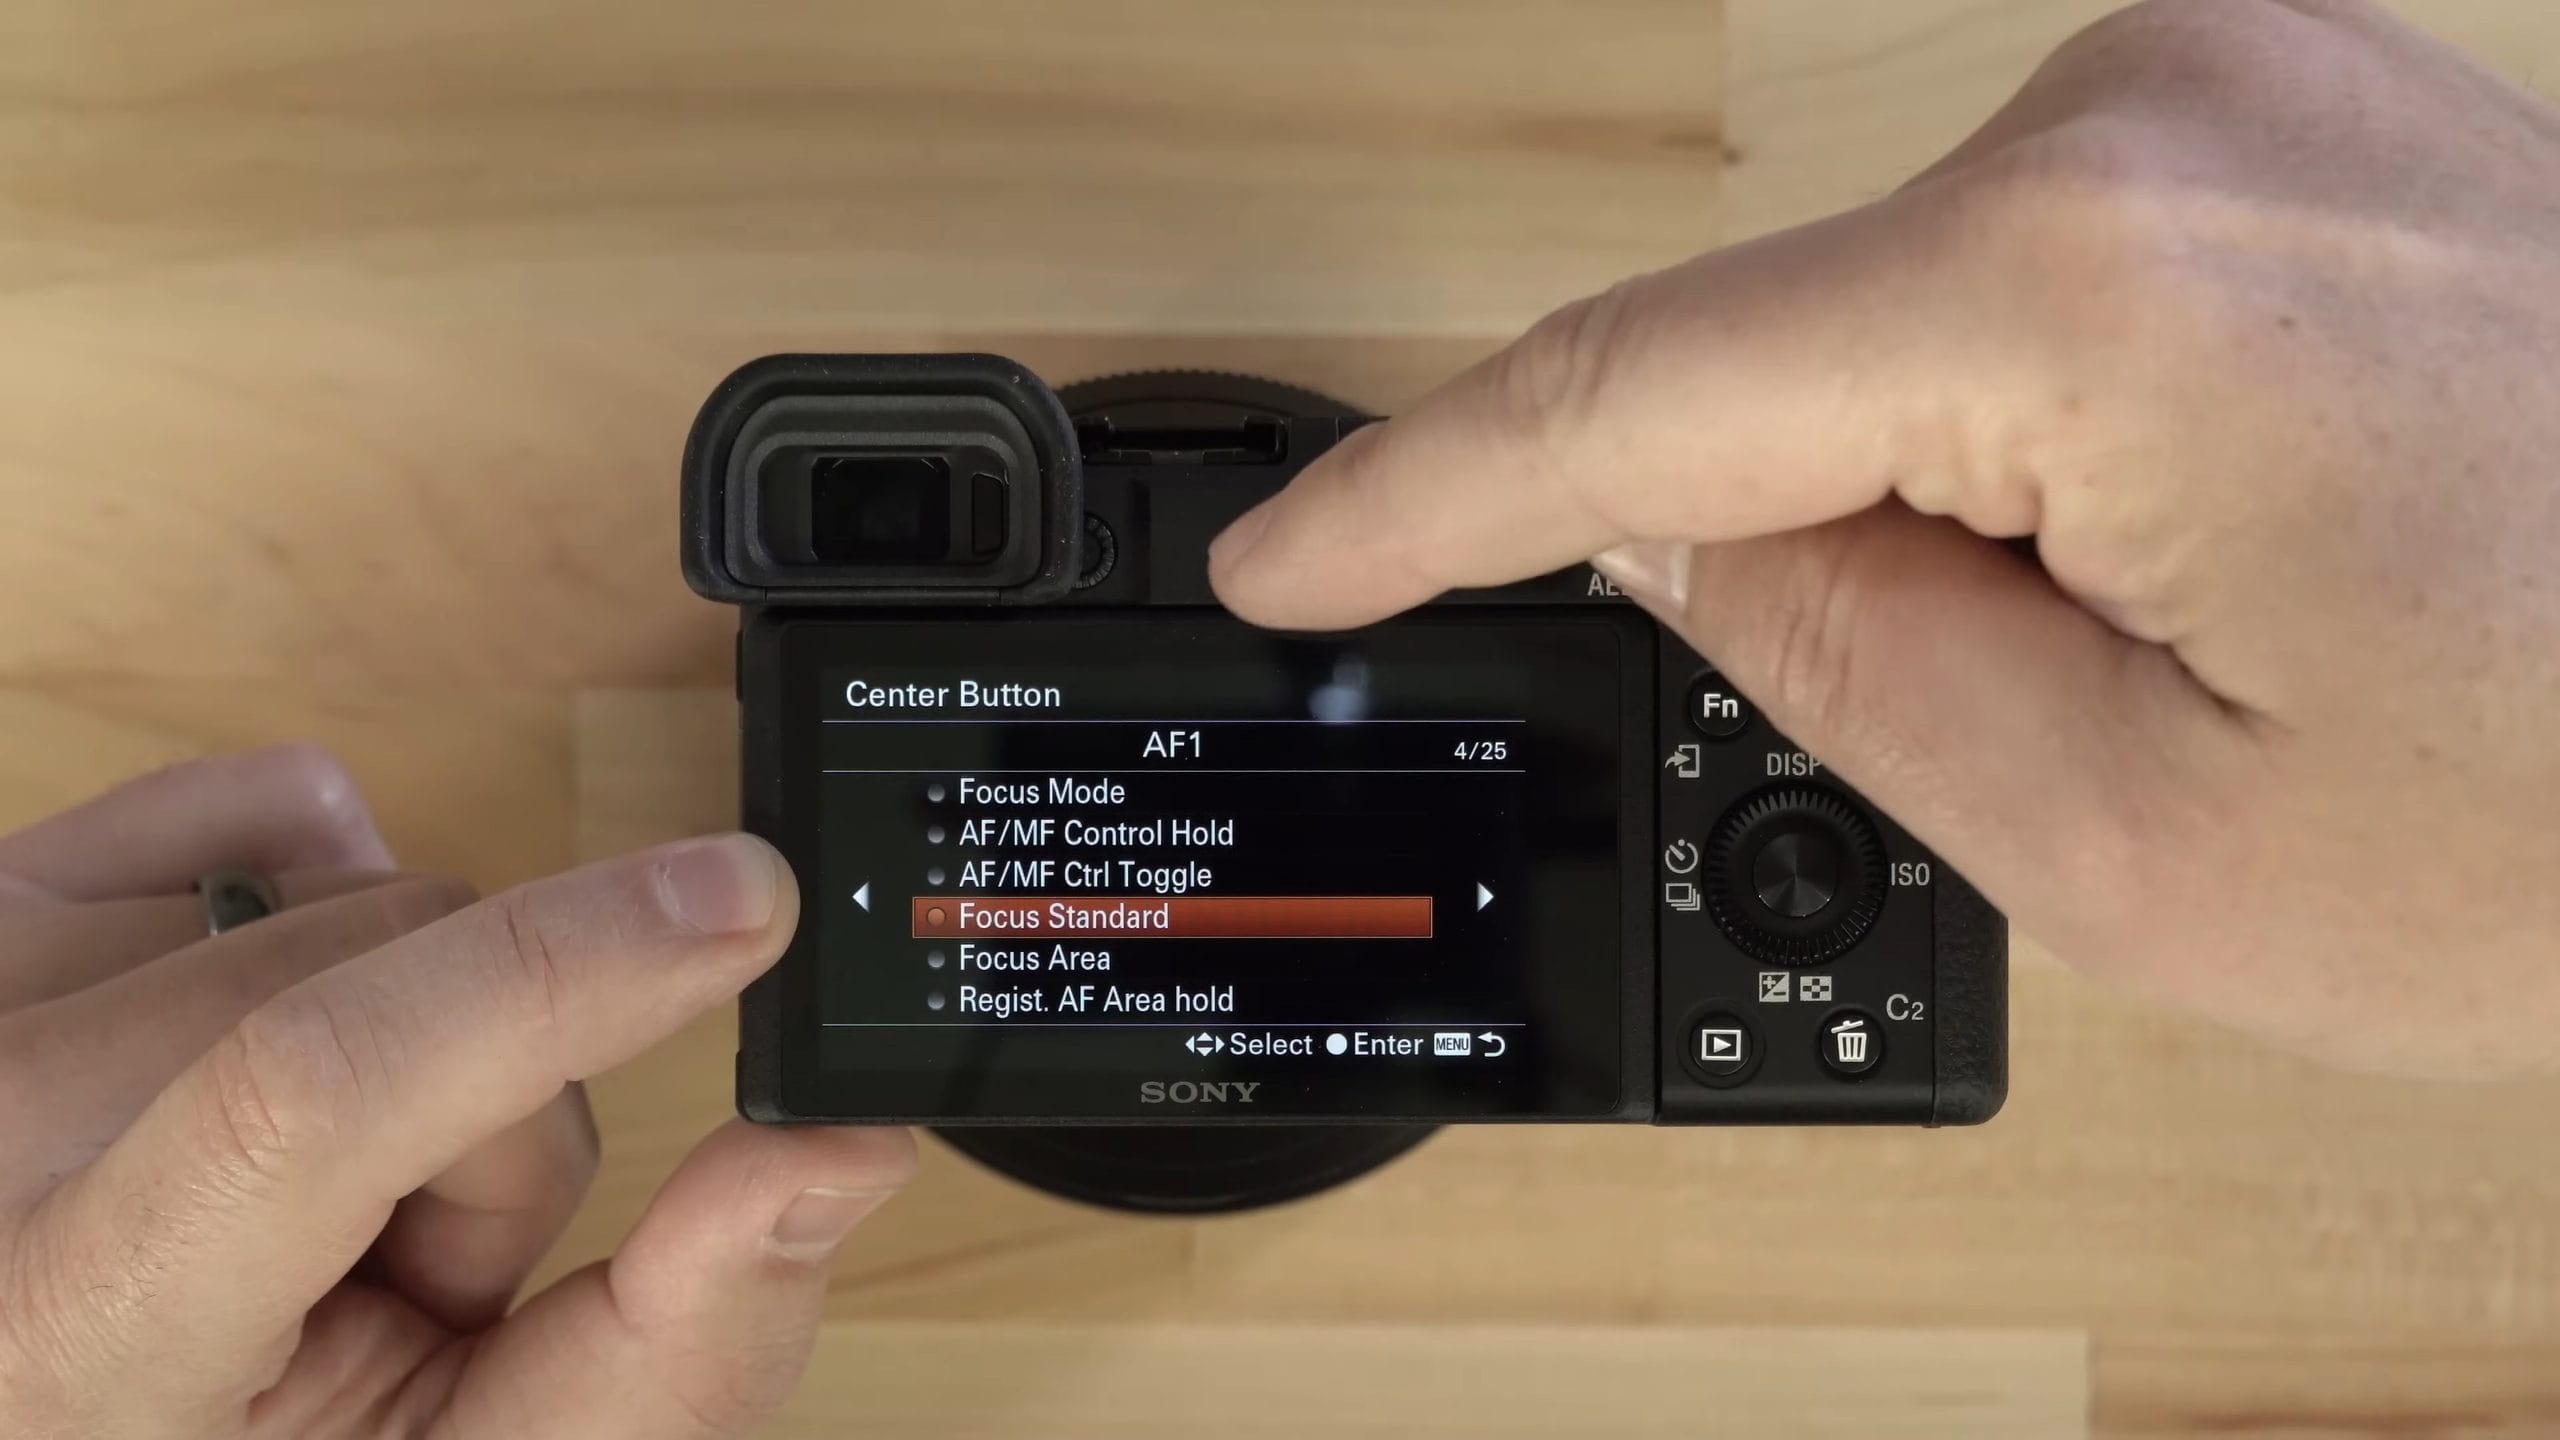
Of course, if this sounds like a little too much, you can stick with some of the other focus areas, like Wide, which is the standard focus area. It’s a great place to get started.
6. Turn Off Audio Signals
The sixth thing I do is turn off audio signals. I hate it when you press the shutter button down and the camera beeps. I don’t need that. I can see with my own eyes that the camera has done it. Go to MENU > Camera Settings2 > Audio signals and set it to Off.
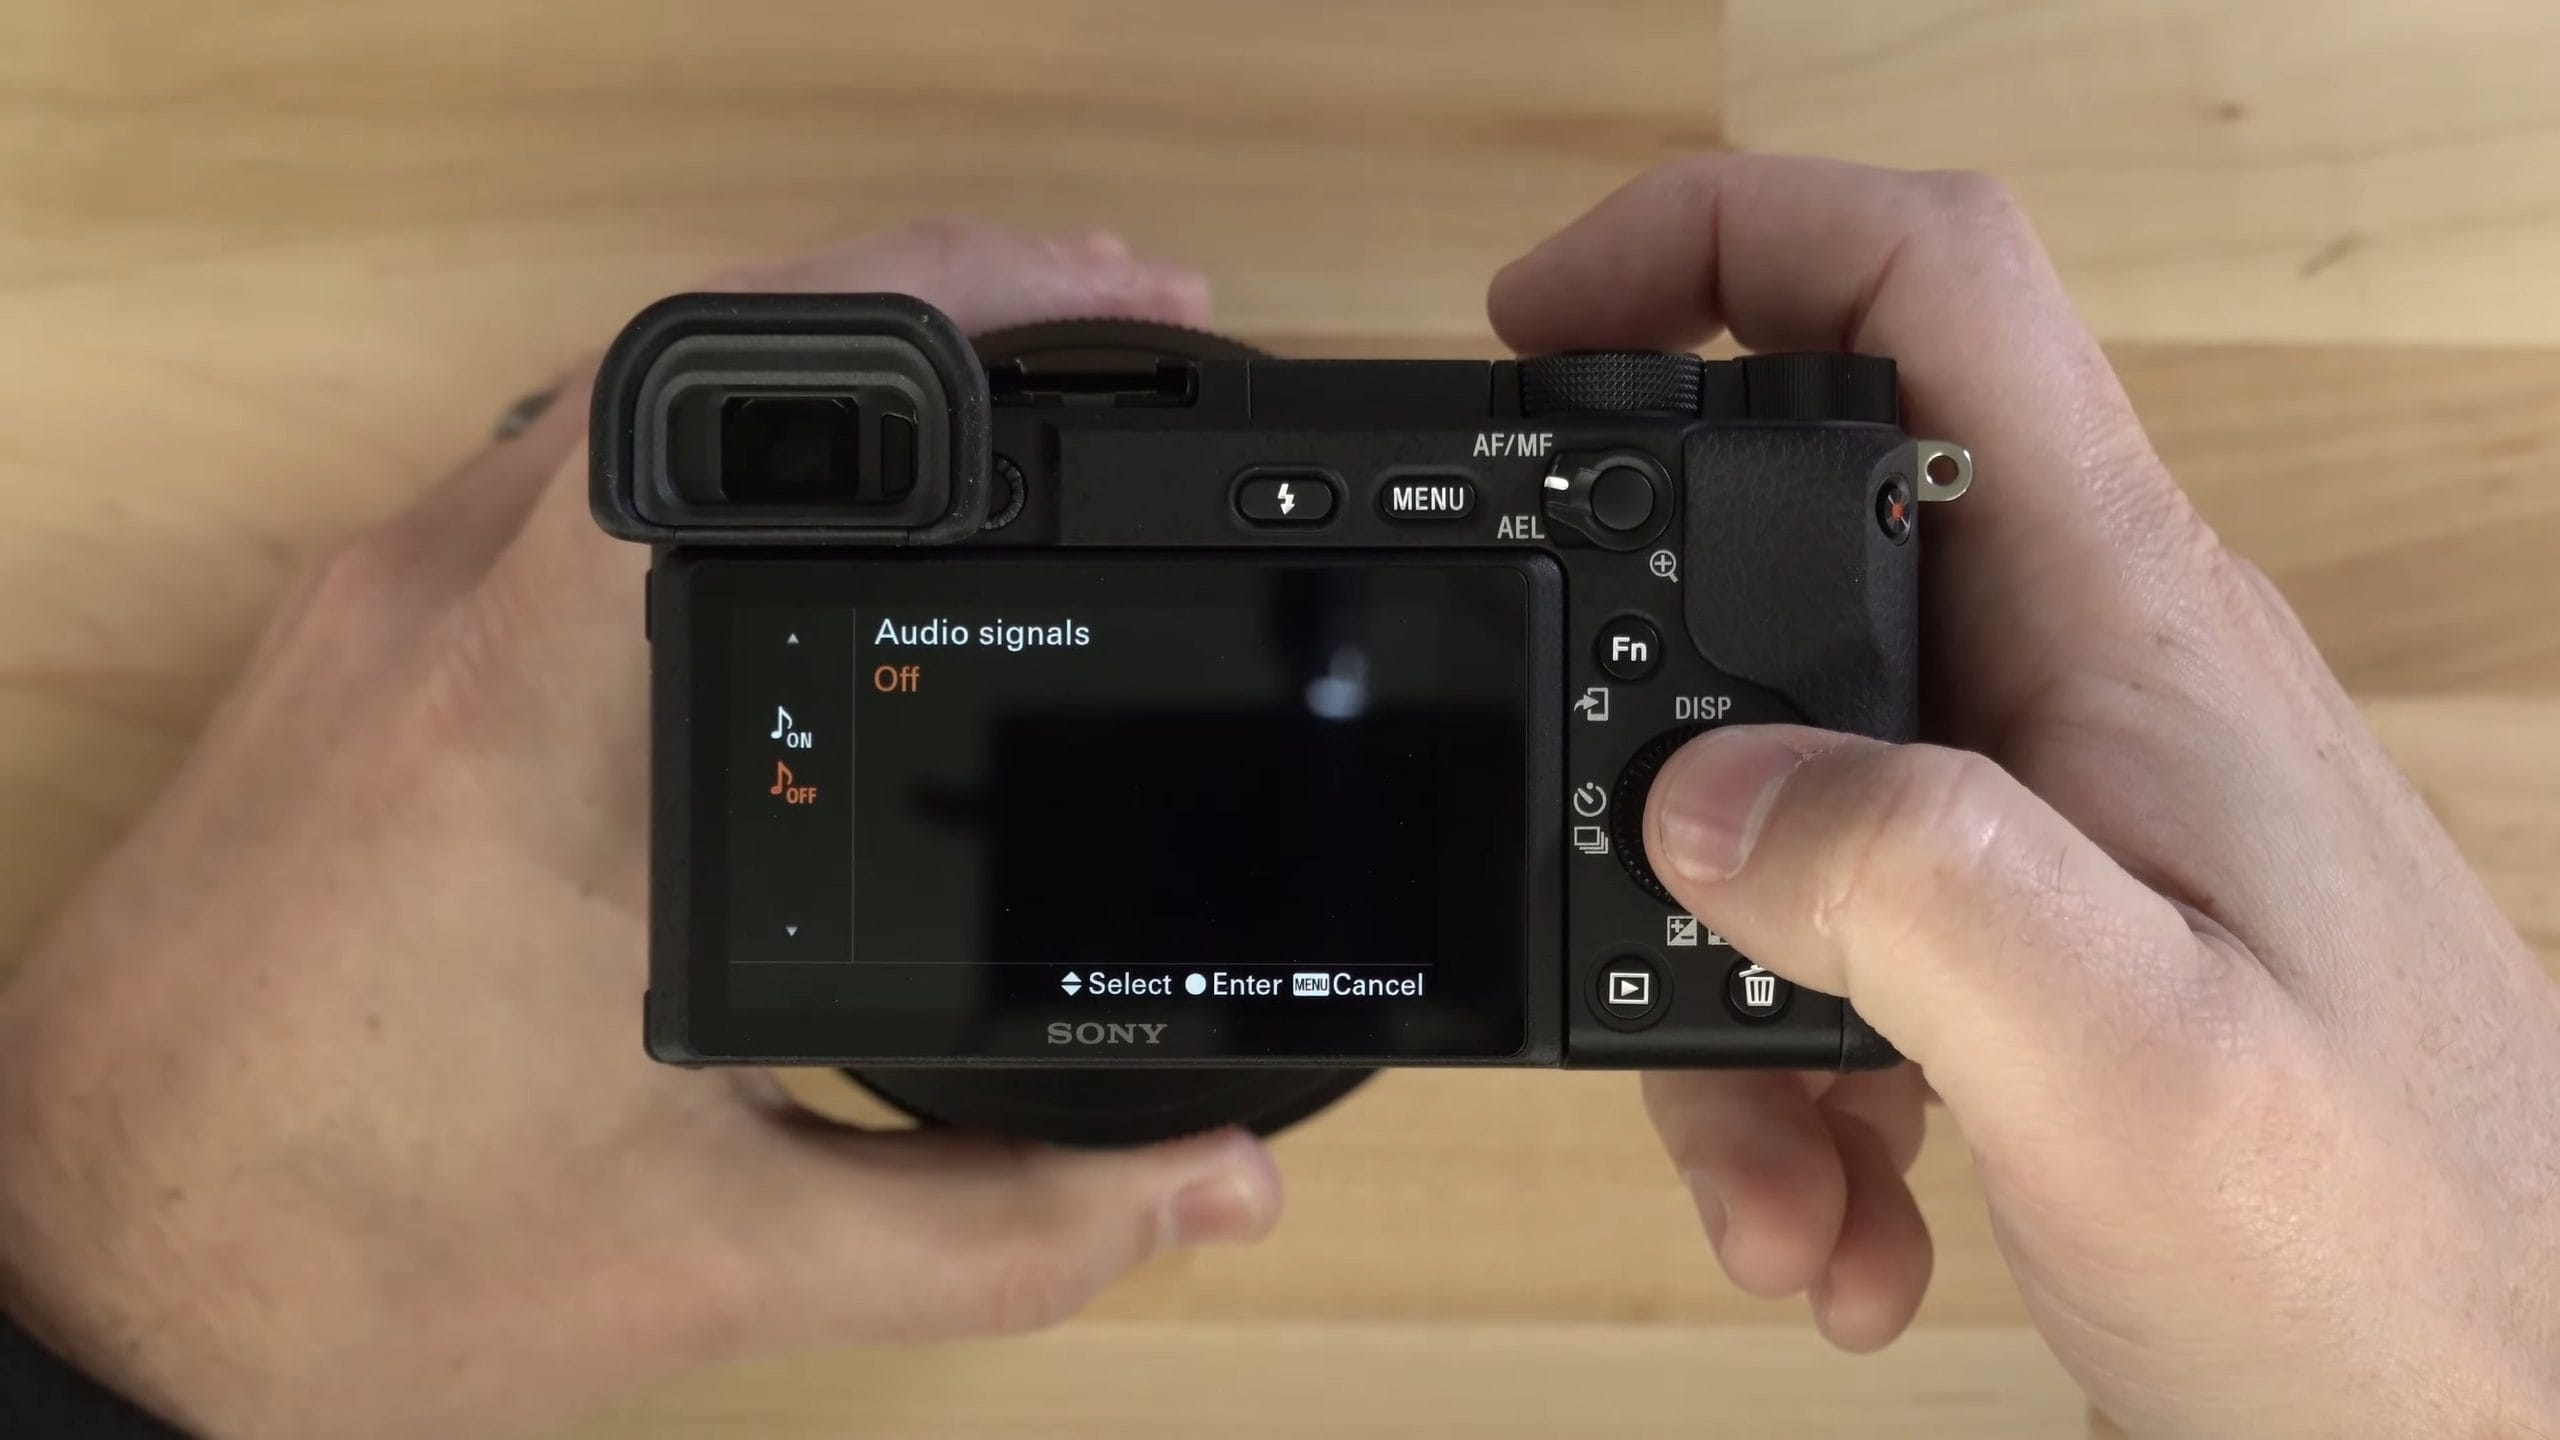
Now when I pull focus, it doesn’t beep. I get those little green boxes showing me exactly where the focus area is, so I don’t need the audio signal. To me, it’s kind of obnoxious. And if you’re into street photography, or you’re trying to take pictures of your kids without them knowing, turning off audio signals is going to help you out.
7. Add Your Copyright Info
The seventh thing I do, because I’m a professional photographer, is set a copyright on my images.
- Press MENU and go to Setup (the little briefcase icon).
- Go to Copyright Info.
- Use Set Photographer to put in your name.
- Use Set Copyright to add “All Rights Reserved.”
- Turn Write Copyright Info on.
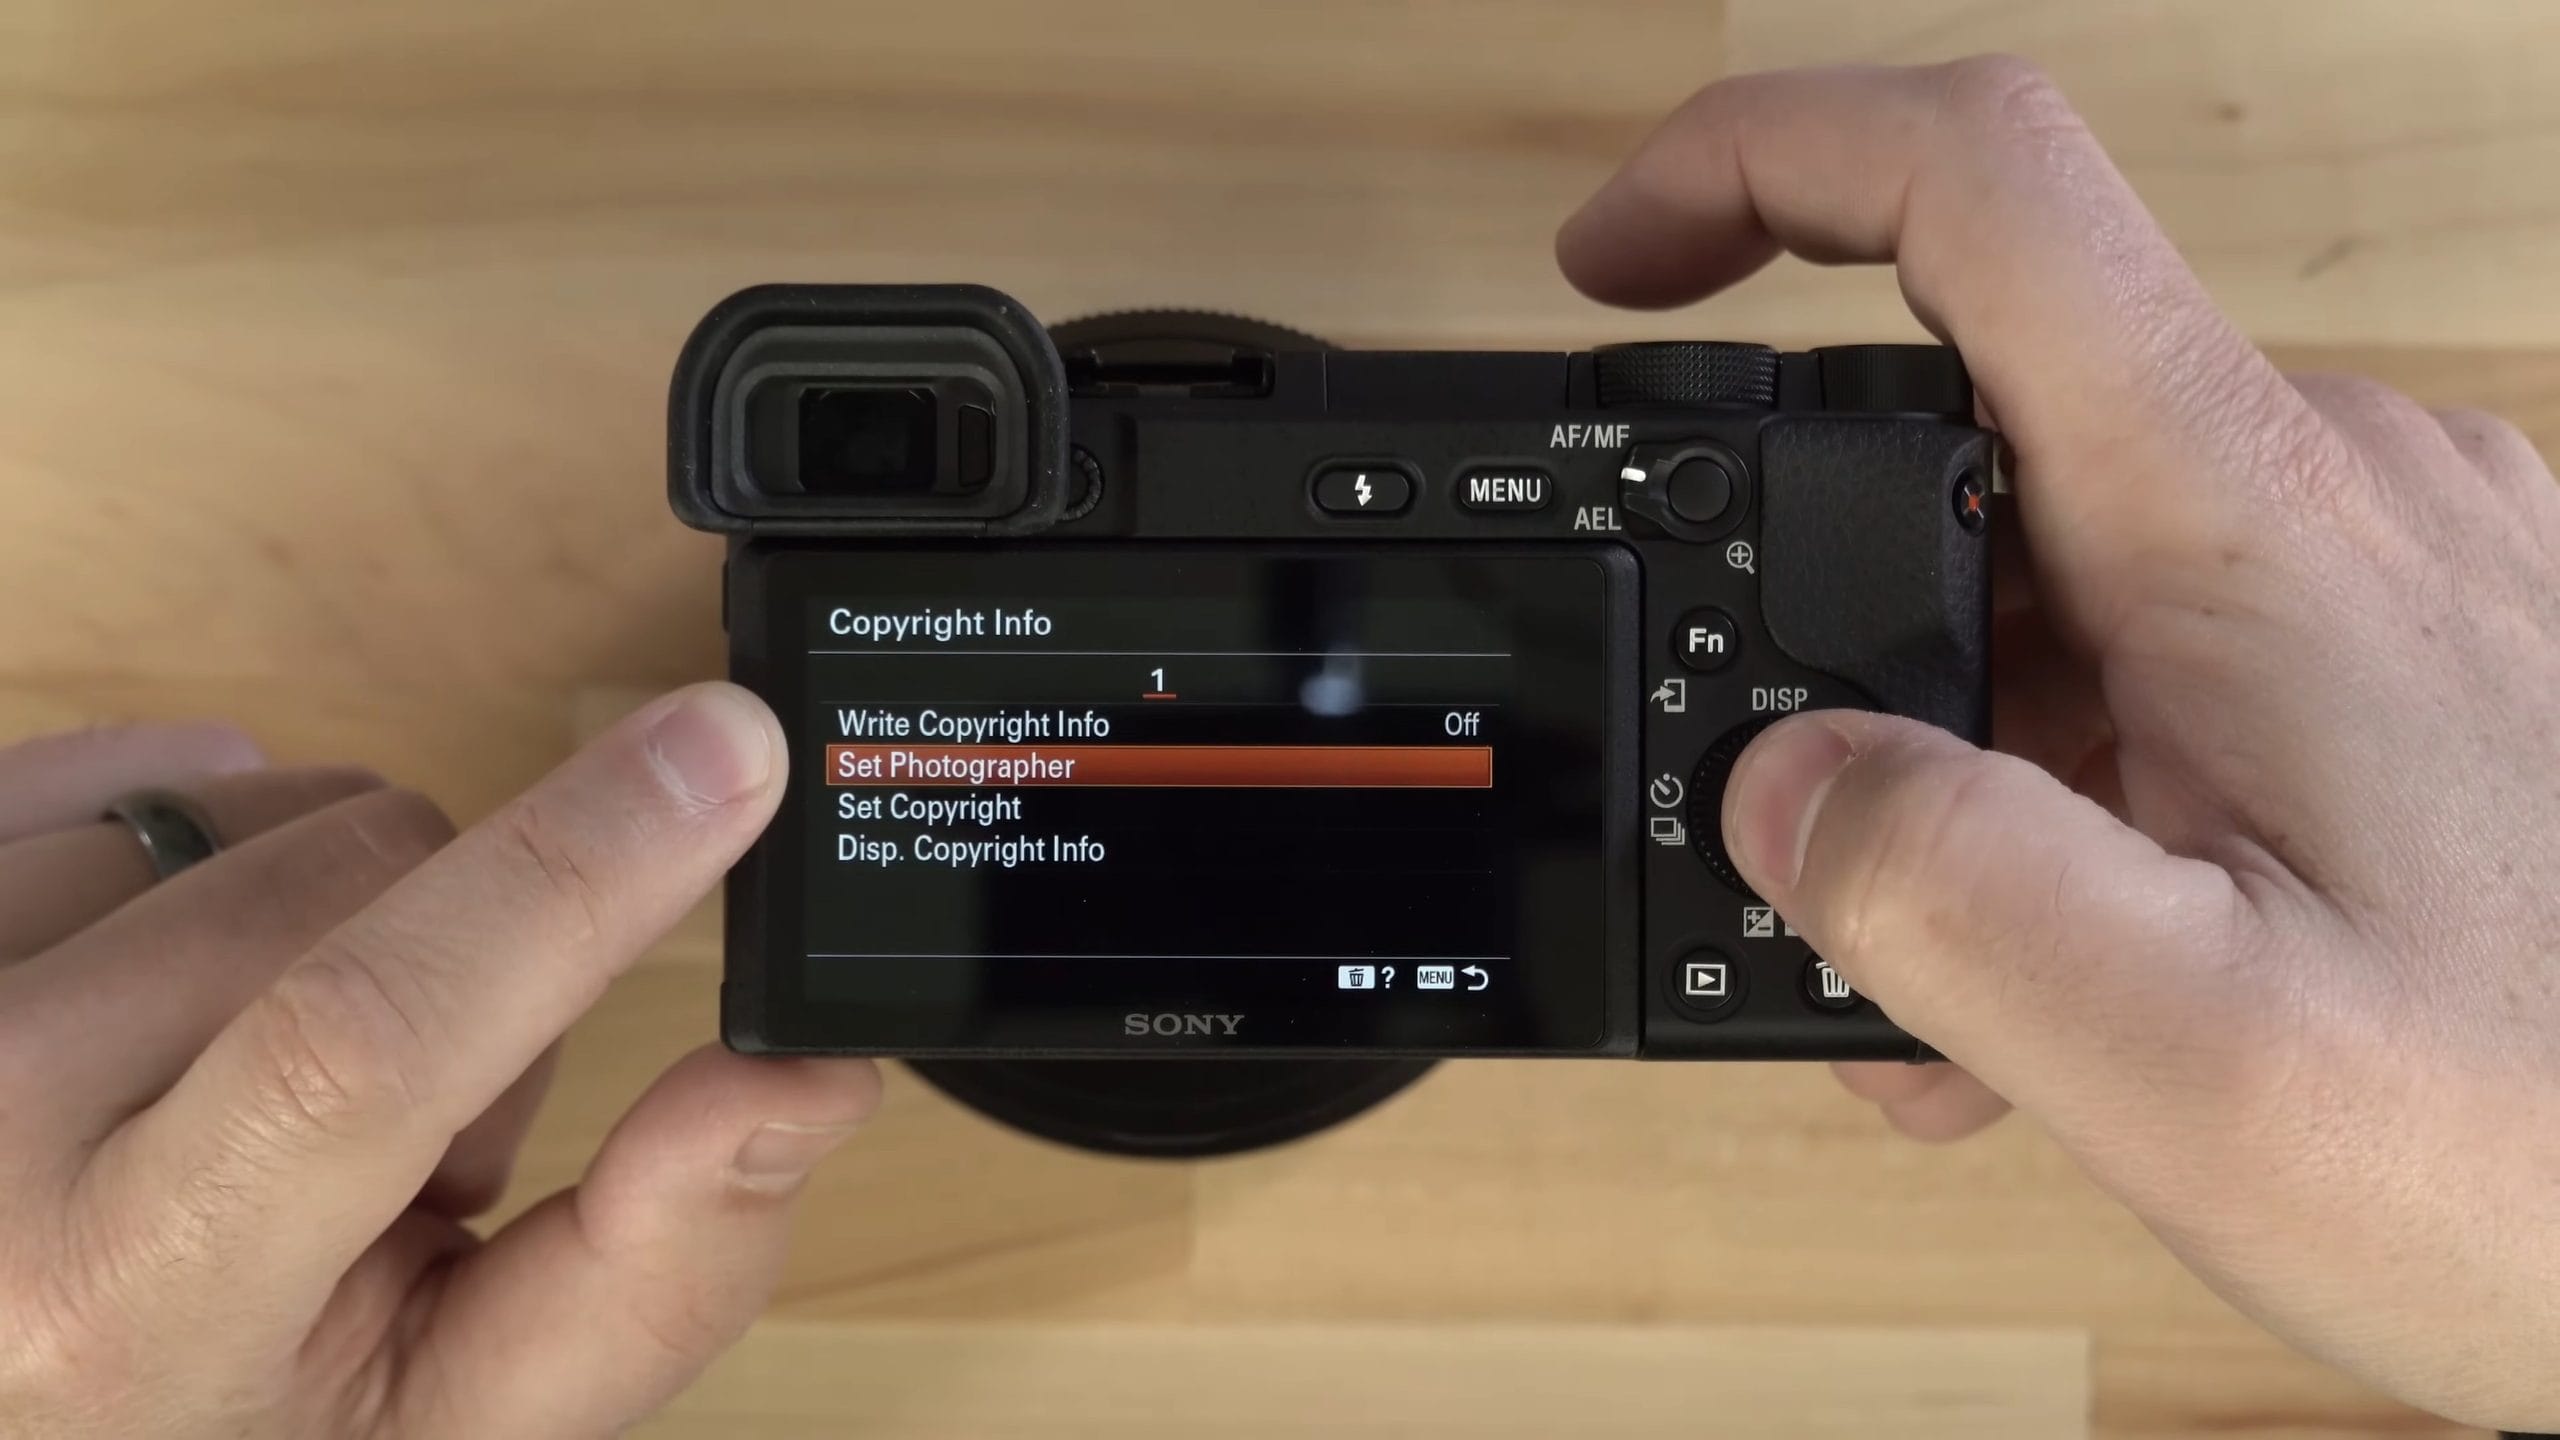
Even if you’re not a professional photographer, you want to do this. When you put your photos on the web, this data is written to the file. So if you post photos of your kids or your family and they end up on somebody’s blog or somewhere they’re not supposed to be, your copyright information is in there.
A person using a photo should know well enough to check whether it’s available for free use. Most people don’t, but they should. If it’s not available for free use because it has a copyright on it, it’s much easier for you to take legal action if they fail to take your photo down when you ask. So I always recommend setting this, and making sure it’s written to every photo you post on social media, the web, or your blog.
Bonus: Always Format Your Card in the Camera
The last tip is a bonus one: always format your card in the camera. Make sure there’s nothing on the card you want to keep, and that it’s backed up to your computer first. I recommend formatting in the camera instead of on your computer, because the exact way the camera formats a card is the best way to prevent issues with files writing to that card. I absolutely never format a card on a computer. Even if I’m going from a Sony to a Canon or a Nikon, I always format it in the camera. You’ll find it in MENU > Setup > Format, and I start with a freshly formatted card every time I go out on a new shoot.
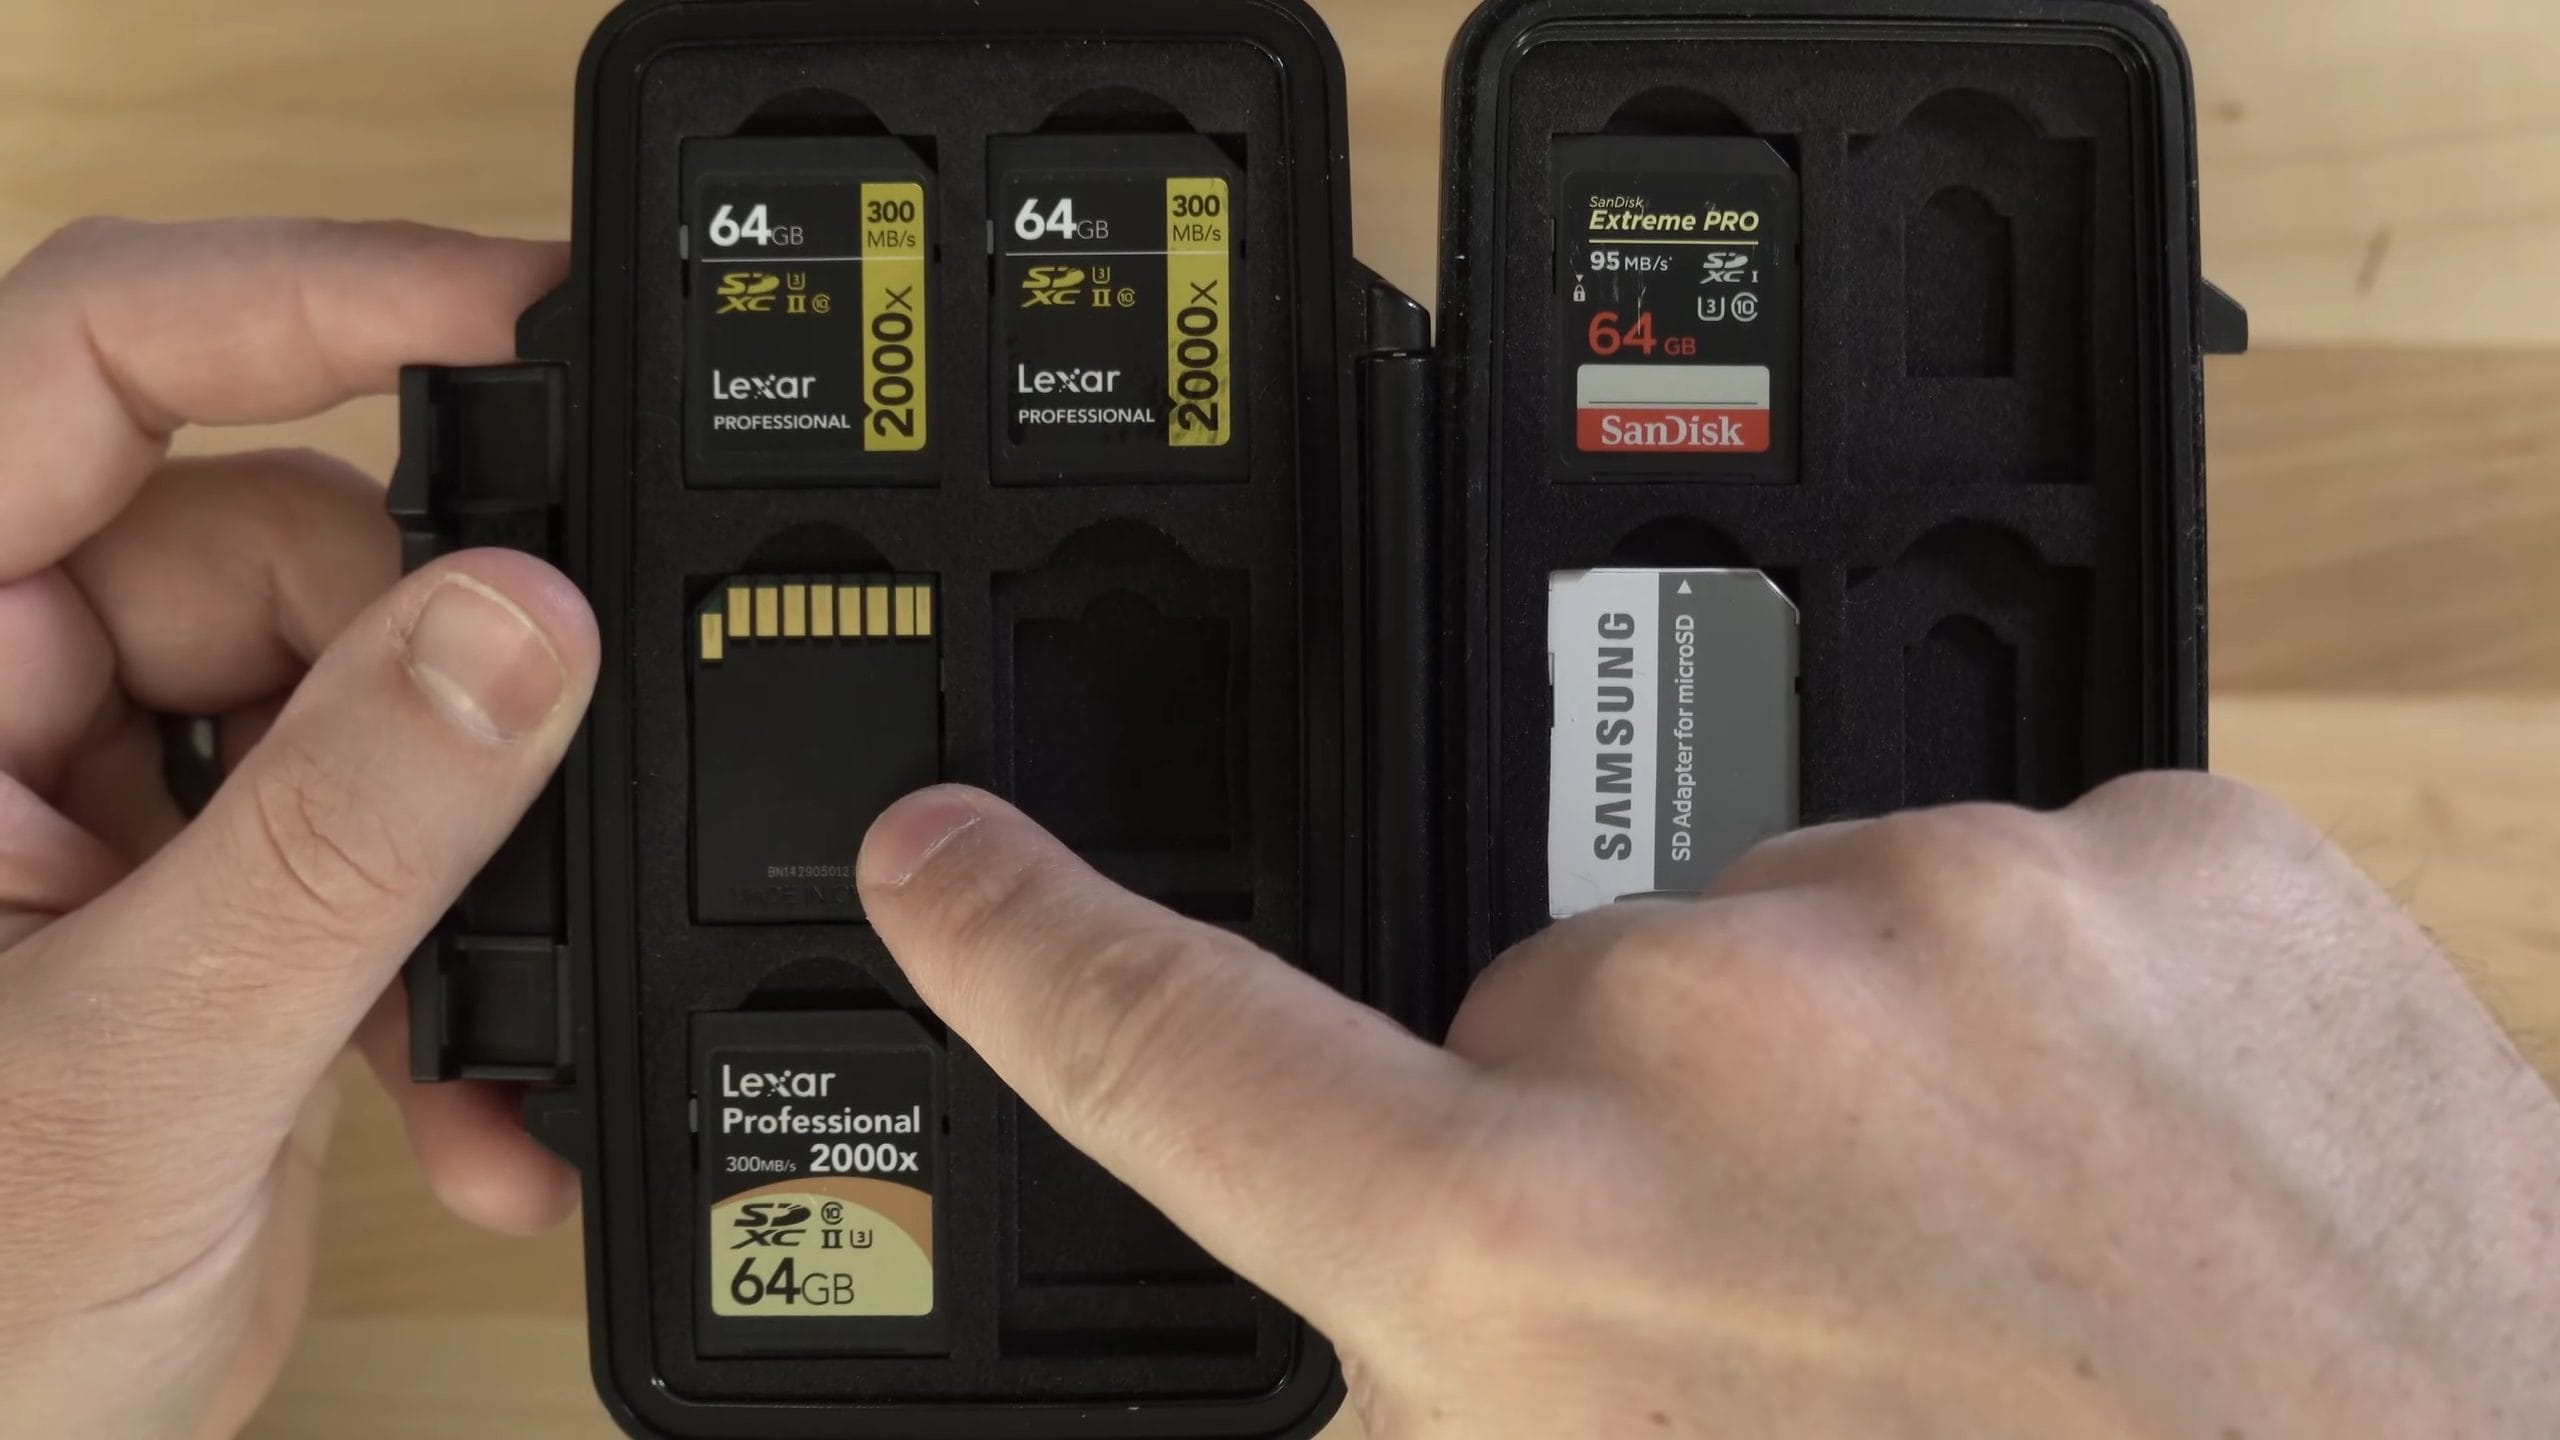
One thing I do with my card case: I flip a card upside down when it’s not ready to be formatted. That way I know whether a card is ready to use again. I’ve never had a card failure, knock on wood, but I take care of my cards. I always format them in the camera, and I keep them in a safe place.
Gear I Use With the a6400
Some of these are affiliate links, which means I may earn a commission if you make a purchase, at no extra cost to you.
- Sony a6400
- Pelican SD card case
- My favorite SD cards
- My favorite compact portrait lens
- My favorite compact wide lens
Still shooting in Auto? My free Ditch Auto course teaches you how to shoot in manual mode, and it’s the course for you if you want to get off Auto.
Was this helpful?
Frequently Asked Questions
Should I shoot RAW or JPEG on the Sony a6400?
Can the Sony a6400 shoot 4K at 60fps?
Which focus mode should I use on the Sony a6400?
What focus area should I use on the Sony a6400?
How do I move the focus point on the a6400 while looking through the viewfinder?
How do I turn off the beep on the Sony a6400?
How do I add copyright info to photos on the Sony a6400?
Should I format my SD card in the a6400 or on my computer?
Related Guides